Showing posts with label Healthy recipes. Show all posts

Tuesday, November 22, 2016

Turnip and Almond Soup


I had been in a mid blogger's crisis past week, just blank about the recipe I should blog next. Sometimes the same block hits me differently. The pictures would be hosted, the recipe drafted and all scheduled, but the introductory part for the post remain unwritten! Weird, but true! :)

Considering my regular readers' choice put up in my FB page, this was handed down by one of my friends, Mythily. I accepted to blog readily, since I have no many soup recipes up in my space.
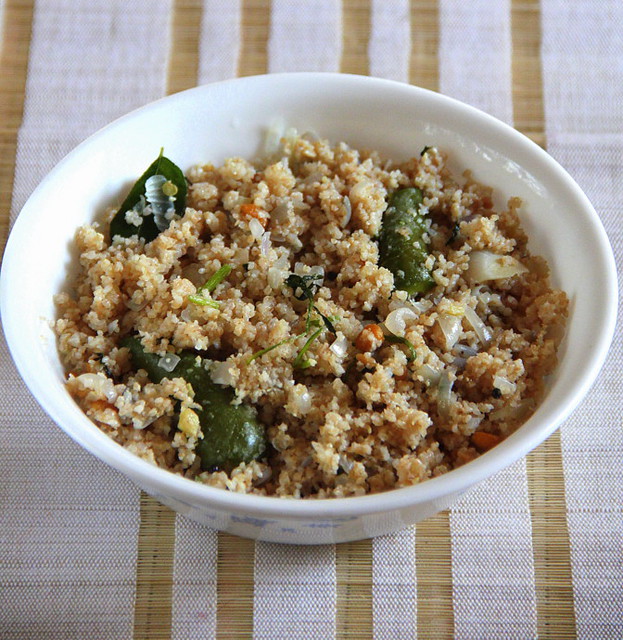
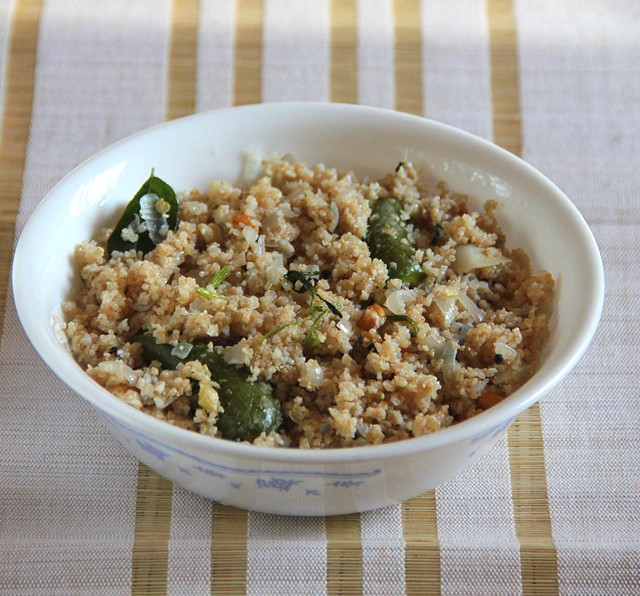
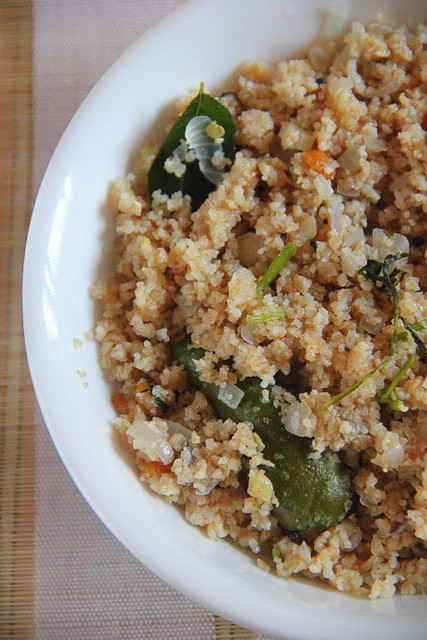
Well, coming to this recipe, it's a heartwarming soup with an exciting combination of a root vegetable, nut and a grass to flavour, rounded off with some dairy; a perfect one bowl meal for the weather shift; fall to winter!


Turnip and Almond Soup
Serves 3
Prep time - 15 minutes
Cooking time - 10 minutes
Total time needed -  less than 30 minutes


You Need: 

Turnip - skin peeled and cubed into 1/2 inch pieces - one 250 ml cup heaped OR 200gms
Almonds- 10 ( blanched, peeled and ground to a fine paste )
Butter - 2 tbsps
Garlic cloves- 3 medium sized
Green chilly - A one inch pieces or 1/2 a chilly
Water (for the soup) - 1/2 cup + 1/2 cup
Lemon grass- 2-3 one inch blades, stripped
Low fat milk- 250 ml

Method:


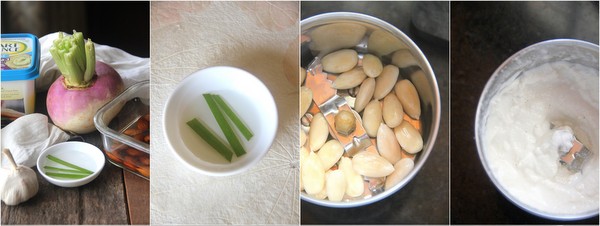
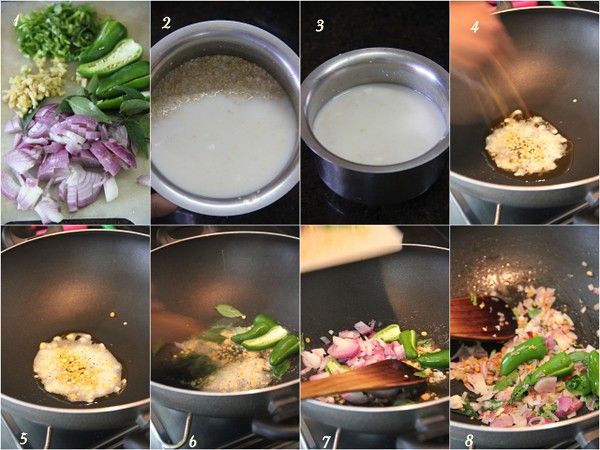
Have the ingredients all at one place. Infuse lemon grass in a tbsp of warm water and rest for 10 minutes. Grind the blanched and peeled almonds to a fine paste. Keep aside.


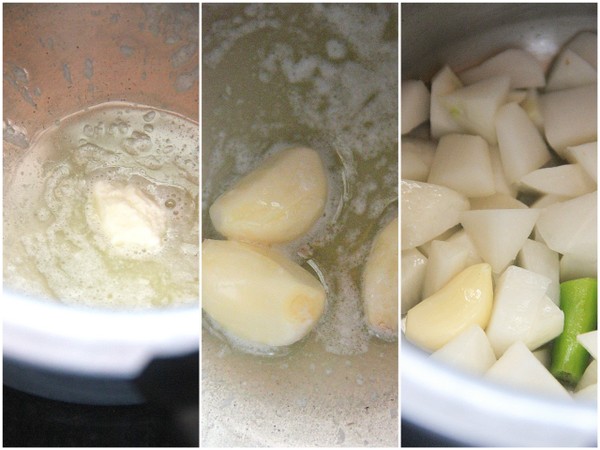
Heat a pressure cooker body, melt butter, sauté garlic and green chilly bits followed by the turnip chunks. Take care to do the whole thing in low-medium heat. We don't want the butter to turn really into ghee in high heat! Add 1/2 cup of water, bring to a boil and close with the lid.


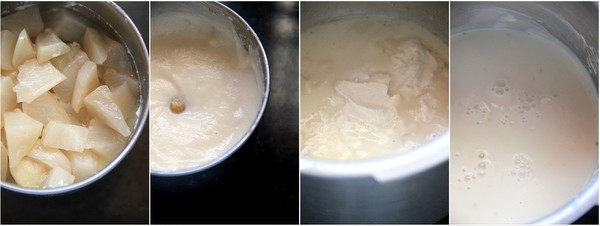
Cook until 4-5 whistles, according to your pressure cooker timing. We want the vegetables well cooked. Cool and grind the whole thing to a smooth paste.
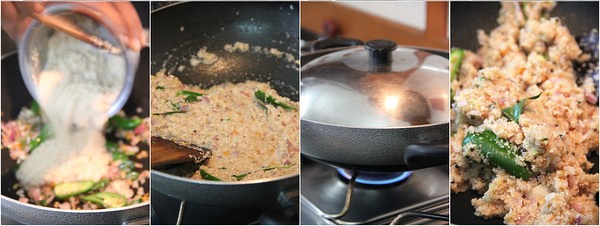
Transfer the above ground vegetables, almond paste, remaining 1/2 cup water and milk and bring the soup to a gentle boil adding salt. Switch off. Add the lemon grass infused water (discard the leaves) and stir to combine.
Season with pepper.


      I seasoned the warm earthy soup, with  Mrs. Dash, to add some zing.


Notes:

You can be versatile with the recipe. Try adding bits of ginger along while sautéing garlic.
Addition of chopped onions (bulbs of spring onions) can bring about an interesting twist.
Whole bay leaves instead of lemon grass can impart a different flavour. You may need to discard the leaves after pressure cooking.

This is a very healthy and nourishing soup, with the goodness of turnips and almonds!

Thanks for the recipe and the suggestions, Mythily. This post is dedicated to you!


Read More »

Tuesday, July 22, 2014

Gothumai Rava Upma ~ A simple spicy meal made with broken wheat


Gothumai Rava Upma


While I am still clearing and organising the things put away carelessly, or rather dumped, during the post wedding phase, I stole some time to check my unread e-mails. Among loving enquiries of absence, ad requests, and personal mails, a few ones from my readers caught my attention. Their common and prime request had been nothing else but to post healthy meals. Simple dishes rich in fibre, wholesome and easy to make with available ingredients. I realised  I had been doing injustice with blogging  with not a good combination of recipes though I take extreme care with my everyday cooking.

Lately, I have been making this 'broken wheat meal' or 'Godhumai upma' made by 'Gothumai rava' for my better half twice a week for dinner but haven't really thought of blogging about it, probably because the portion gets over by night and there wont be anymore left for the next day's photo shoot. So, this one you see was made in the morning, shot, blogged and reserved for his dinner :)

I have made this according to his palate preferences; soaked in butter milk instead of water as he likes the natural tanginess of the same, extra ginger bits and no addition of vegetables. He insists Rava Upma has to be made this way and the addition of vegetables makes it a 'Khichadi'.

Soaking time- 15-20 minutes
Total stove top time- 15-20 minutes

Now, to make the 'Upma' to serve one,
Get Ready with:

Broken wheat rava - 3/4 cup
Table salt- 1/2 -3/4 tsp
Oil- 1 tbsp
Mustard seeds- 1/4 tsp
Urad dal- 1/4 tsp
Bengal Gram dal- 1 tsp
Ginger, a one inch pc, chopped fine
Green chillies- 2, slit across
Big onion- 1 chopped
Thin and slightly sour butter milk - 3/4 cup or enough to soak the rava
Chopped coriander leaves- 1-2 tbsps
Curry leaves- A sprig


 Method:

Godhumai Ravai Upma

Soak rava for 15-20 minutes in butter milk and salt, enough to cover and the liquid stays 1 cm above it. In the meanwhile chop the onions, ginger, chillies and coriander. After the rava has soaked well (press the grains to check whether they are fully hydrated and soft), heat a tbsp of oil in a non-stick kadai, splutter mustard seeds, brown the urad dal followed by the bengal gram dal. Throw in the ginger bits, chillies and onions in order and sauté until the onions are translucent and partly cooked. Say for 2-3 minutes in medium flame.


Godhumai Ravai Upma

Add in the soaked rava. Stir gently to combine. Close the kadai with a lid for 5 minutes keeping the flame low. Stir the upma at intervals, twice or thrice during this phase and close to lock the steam in. Open after 5 minutes. The Upma will be sticky at this point. Keep stirring at intervals, adding curry and coriander leaves in the open kadai, until the stickiness wades off and the rava is cooked with the seasonings infused well enough, for around 8-10 minutes. The Upma shouldn't be too dry as well. There should be a tint of moisture when you feel it between your fingers.
Serve hot with Coconut Chutney. I made it later in the evening and could not include here :)


Godhumai Ravai UpmaGodhumai Ravai UpmaGodhumai Ravai Upma

Read More »

Wednesday, November 20, 2013

Palak Keerai Masiyal / Puréed spiced-up Spinach


Palak Keerai Masiyal

As we know, 'Palak' is the Hindi name for spinach, the common healthy greens, and 'Pasalai Keerai', the Tamil.
Having this on my mind, I requested my vegetable lady to bring 'pasalai keerai'. She confronted me with real fresh bunch of greens with oval shaped fleshy leaves that bore tiny pink flowers. The bunch looked cute. I cooked and mashed the leaves, but found this one totally slimy and non-edible! Strange but true.

Lately, I learnt the exact greens I was searching for was called 'Palak Keerai'! This one had longer and broader leaves which were thinner.'Pasalai', I was told, was a different variety: the one with oval leaves and pink flowers.Strange again. I still get confused!

I tried this dish while in Namakkal. The town sells fresh greens, no matter where you live, you can grab the freshest bunch every morning from the vegetable ladies or the nearby shops. I got the bunch from the market.
Those were the times when I was the guardian for my school going son who was in high pressure preparing for the public exams. I saw to it, he received healthy and tasty diet.
'Palak Keerai Masiyal' was thus born, a recipe I tweaked from my other mashed spinach recipes combined with the tips given by my neighbour. Neither my mom or ma-in-law had cooked the same and I had not tasted too. To my excitement, my son really loved this one and I included in his lunch menu, twice a week. The intake of spinach in this form will be greater by one who eats it and the mashed form is better assimilable. This 'Masiyal' or 'Kadasal'( meaning mashed) is thus one of the tastiest greens I prepare!


Palak Keerai Masiyal


Palak Keerai Masiyal/Kadasal
To serve a family of 4
Time taken - 40 minutes

A small bunch of Spinach/ Palak
2 tsps of oil
1 medium sized big onion, chopped
Half of a green chilly  or one small, slit lengthwise to two pcs
1/4 tsp cumin/jeera powder
A fat pinch or turmeric powder
1 medium sized tomato
5-6 cloves garlic
2 tbsps of cooked thuvar dal
Salt- 1/2 tsp or as needed

Seasoning (optional, I didn't do as my son dislikes. The taste was still good!)
2 tsps of oil
1/4 tsp of mustard seeds and urad dal
A red chilly, broken into 3 bits
Pinch of hing


Palak Keerai Masiyal

Wash well enough and retain the leaves and tender stem. I retained just an inch of stem from the leaf. Discard the fibrous parts of the stem completely. Chop the greens. You may not need to chop fine since we are going to cook them. Rough chopping will do. Heat 2 tsps oil in a kadai. Sauté the onions adding salt until translucent and then the garlic and chilly. Add in cumin and turmeric powders...


Palak Keerai Masiyal

..followed by the tomato pieces and sauté until they turn mushy. Top up with chopped spinach. Sprinkle 1/4-1/2 cup of water and close the pan with a lid.Turn the flame to low-medium and let it cook for 4-5 minutes. Open and check whether the palak is cooked soft. Fresh greens let out water while cooking so check the amount of water you sprinkle earlier.


Palak Keerai Masiyal

Now that it's cooked, stir in cooked dal. Switch off fire and let it cool. The whole mass should be moist may be with 2-3tsps and water in it as you see in the picture. Too much of water will spoil the consistency of the 'kadasal'. If you feel it's too dry, add 2-3 tsps of hot water.Purée or blend in a mixie. Check salt. Serve with steamed rice or phulkas.


Palak Keerai Masiyal

Read More »

Tuesday, October 8, 2013

Konda Kadalai Sundal for Navarathri


Konda Kadalai Sundal


I amn't really very religious by nature. I do follow the festivals and recipes to the dot since I love that part of them. Navarathri is such a festival I enjoy visiting houses where I am invited, appreciating the 'Kolu', singing, exchanging 'kumkum' and flowers and savouring 'Sundal' prasadams. These days I am getting to know much about how the 'sundals' are related to the Navagrahas(the 9 celestials) and 'Navadhanyams' or the 9 cereals/pulses/legumes for the 'Navarathri' or the '9 nights' festival!

It's interesting!

SundaySooriyan – Sun: Godumai (Wheat)
MondayChandran – Moon: Arisi (Rice)
(since it is not practical to make sundal out of these, generally they are broken and made as 'payasams' or 'puttu' as 'neivedyams')
TuesdayAngarakan – Sevvai – Mars: Thuvarai (Thuvar Dhal)- Sundal can be made. Here's how I made with whole Thuvar grams.
WednesdayBudhan – Mercury: pasi Payar (Green Gram)- Sundal can be made.
ThursdayGuru – Jupiter: Kadalai (Channa dal) or Konda Kadalai (Whole Channa or Cow peas) Recipe featured for today below!
FridaySukran – Venus: Mochai (White Dolicho Beans)
SaturdaySani – Saturn: The tiny black Ellu seeds (Sesame Seeds) neivedyam can be 'ellu urundai' or the sesame seed balls.
8th day of Navarathri – Rahu: Kollu (Horse Gram)
9th day of Navarathri – Ketu: Uzhundu (Whole Urad )"Vadai" can be made. Here's the recipe for Vella Vedai made with a combination of jaggery and urad.

 The recipe for today is  Konda Kadalai Sundal, the Thursday's 'neivedyam' or the offering for Guru.

Read More »

Tuesday, September 17, 2013

Vazhaithandu Koottu ~ A no-grind banana stem curry made with moong dal


Vazhaithandu Koottu


Back from a 2 week holiday, V and me were craving for some light comfort food. Some fibre-rich dish which has some body again and mildly spiced. The very same day, ma in law sent me along fresh chunks of stem chopped out from her garden! I was excited.

Many of you already are aware of the goodness of  banana stem. If not, here we go:
Banana stem adds bulk to the food and is very useful for all those who wish to lose weight.The fibre in the stem helps to cure constipation and detoxify the body. Banana stem also acts like a diuretic helping to eliminate waste fluids from the body and helps in eliminating kidney stones. Being a body cooler, it is highly recommended in tropical countries.
Read More »

Thursday, October 4, 2012

Rustic Wheat, Date & Walnut Bread


I came across this beautiful looking bread in Chinmayie's space. Ever since I had been dreaming baking this, taking pictures and savouring the heavenly stuff!

The attractive part was that, the recipe of this bread seemed to be flexible and I loved the way she'd described..

Read More »

Thursday, September 6, 2012

Banana Walnut Bread - without eggs!


                                                Tastespotted and Foodgawked

I admire her.
So does she.
I appreciate her talents and creativity.
So does she.

Read More »

Monday, May 7, 2012

Vegetable Broken Wheat Biriyani


These days I find myself substituting rice with whole wheat, surrendering to the pre occupied notion that wheat is healthier than starchy polished rice! Be them, idlies or upma I find comfortable enough with the variety of easily available broken whole wheat grains in the market.
The vegetable broken wheat biriyani made here is a one pot meal after my hit recipe easy tomato biriyani :)
The recipe and method for this one is entirely different and a bit elaborate but you can always preserve the masala coated veggies which stays well in your chiller even for a week, until you can mix up and heat it with rice of broken wheat to make the meal!
Flavourful and loaded with vegetables, healthy too...

Read More »

Wednesday, February 29, 2012

Mullangi Keerai (Radish Greens) Poriyal / Thoran


Radishes in the plant bed


The fully grown root veggie pops up the ground and is ready to be pulled out!


I wet the soil well and Yay!  I harvested my own radish (radishes, but pictured only one) in the kitchen garden!
I never knew the greens are edible and badly wanted to make good use of the healthy organic greens. I decided to make poriyal / thoran, which is gonna be my first attempt!


Here we go..


 So, to start with, slice away the radishes underneath and wash the greens well in running water.


Remove the hard stem (if you feel rough while chopping.The stems here were tender) and chop the greens. Mine were a little spiny and I noticed them getting soft while getting cooked!


Top it with green chillies, onions, turmeric powder, salt and coconut.


and mix gently with your fingers well to combine.


Heat oil in a kadai, splutter the mustard seeds, brown the urad dal and dump the green mixture.


Sprinkle some water, say, a tbsp and close with a lid once it starts steaming. Open the lid once every 3-4 mins now and then sprinkling a tbsp of water to keep it hydrated and not letting it turn too dry.


Radish greens need a longer time to get cooked; for about 15-20 minutes.


 They do wilt and change colour as any greens while getting cooked but still stay a bit crunchy!
 Yummy and healthy as well :)


Serve warm with steamed rice or Indian breads.
The leaves taste a li'l bitter, but flavorful!


Now, for the recipe all in one place..


You need:

A  bunch of radish greens (3 large cups +/- ,  loosely filled)
Green chillies- 3-4, slit  lengthwise and halved (you can susbstitute red chillies, which go better)
Turmeric powder- 1/4 tsp
Shallots- 10-15, sliced ( I used 1/2 big onion)
Salt- to taste
Grated coconut - 1/4 cup

To Season,

Oil-  a tbsp
Mustard seeds- 1/4 tsp
Urad dal- 1/2 tsp

Method:

Slice away the radishes and wash the greens well in running water.
Remove the hard stem (if you feel it rough while chopping.The stems here were tender) and chop the greens.Mine were a little spiny and I noticed them getting soft while getting cooked!
Top it with green chillies, onions, turmeric powder, salt and coconut and mix gently with your fingers well to combine.
Heat oil in a kadai, splutter the mustard seeds, brown the urad dal and dump the green mixture.

Sprinkle some water, say, a tbsp and close with a lid once it starts steaming.
Open the lid once every 3-4 mins now and then sprinkling a tbsp of water to keep it hydrated and not letting it turn too dry.

Radish greens need a longer time to get cooked; for about 15-20 minutes. They do wilt and change colour as any greens while getting cooked but still stay a bit crunchy!


Read More »

Monday, November 14, 2011

Godhumai Idiyappam / Whole Wheat Flour String Hoppers


Healthy breakfast always goes a longer way. The easily digestible steamed food is not only nourishing but is apt for all ages.

Here is a breakfast which you can prepare within minutes. If you do not have the time to make a side dish for this one, simply drizzle fresh melted ghee and top with sugar. It will definitely be a change to your routine cereal and fruits!

Honestly I havent tasted this ever since. Neither I have seen my mom or in laws steaming wheat flour hoppers!
I was much prompted to try this after a phone call with V's cousin lately  after her beautiful narration of how it's prepared by her ma in law! So, being my first attempt I am still unsure whether I had perfected with the outcome but still couldn't stop me from sharing with you, about just how I made it!


Yields- 10-12 small idiyappams
Serves  2

Whole wheat flour- 1 cup
Salt- 1/4 tsp
Oil - a tsp
Coconut shavings- 1/4 cup or as needed
*Water 1 cup + 2tbsp


Fry the sieved dry flour in a thick/copper bottomed kadai to ensure even heating.(No oil is added)
Keep the flame low-medium and fry continuously. Within two minutes you will see streaks of flour turning dark brown at the bottom and sides even while you stir continuously!


Minimise the heat to low and continue for 8-10 minutes. Take care not to burn the flour!
I fried for 9 minutes, continuously and carried on for another minute in the heat of the pan.


Transfer the flour to a bowl and heat water with salt added. The water should be just hot and should not bubble as you see here.


*For 1 cup of flour, start with 3/4 cup and add the remaining water carefully, little by little. Stir in oil in between.
I needed 1 cup + 2 tbsps of water to make the dough.The amount of water depends upon the quality of the wheat flour as well. Prepare a soft warm dough using a ladle or a wooden stick.


Shape the dough into small cylinders with your fist before to ease into the presser.


Squeeze out the warm dough on your idiyappam plates over the sprinkled fresh coconut gratings.


Place over the steamer, on fire, and it's ready to be steamed.


Steam for about 10 minutes or until done.


Topple carefully inverting the plate with cooked idiyappams over another one.


Wheat Idiyappams go well with coconut based curries like Vegetable Ishtoo / Stew ,  Mutton Stew or Vegetable Khurma. I served with an onion based gravy which was fine too.


I loved it topped with melted ghee and lots of sugar :)


So, never bother if you don't have a side dish in hand..


                    The warm melted ghee and sugar combo is simply flavorful and delicious!

Note

Whole wheat flour with comparatively less gluten content makes the best idiyappams. I used Aashirvaad atta.

Never use boiling water for preparing the dough. Boiled water cooks the flour and makes it difficult to squeeze. The hoppers get  too soft and soggy too!
Fry the flour well. I fried for 9 minutes continuously and continued for another minute in the heat of the pan and am thinking of frying for 9-11 minutes over controlled flame and a minute without flame, the next time I try, making a total of 12 minutes frying time.

Wheat flour Idiyappam needs a little more time than the Rice Idiyappam to get cooked.So, give at least 10 -12 minutes cooking time.

Warmer the dough easier the squeeze. A smart cook can always preserve the heat of the dough, kept as a ball, in a hot box / casserole until the next batch is squeezed. Or one can squeeze out on a couple or more plates and steam the batches at the same time, thus acting fast.

Another method of preparation - Wheat flour is steamed for 20 mins,cooled and sieved, made into a dough and squeezed out. I haven't tried this method though!
Read More »
Related Posts Plugin for WordPress, Blogger...