Little did I know about the nutritious fibre rich
Kambu Saadham or the millet meal before I was married or settled in central Tamilnadu. These grains, of two varieties named
veerian kambu or
nattu kambu, entered our house in small sacks before summer. The grains which came directly from the farm had to undergo a long process; stones removed by handpicking, getting rid of dried grass and tender sticks mixed along and then washed, dried and pounded in the traditional
ural and
ulakkai alternatively by two maids.....wish I had the pic and regret for not being into blogging then....
While we had to squeeze our brains planning a meal out to satisfy all the members in our joint family on a daily basis, this millet meal received unanimous support as it was undoubtedly favourited by all!
Honestly, I never had a hand in preparing these meals then, ma-in law and ammayi supervised the maids to get it done in bulk. I concentrated in making the
kuzhambu and
koottu ( I will do a separate post soon) which went with the meal. This hot meal served with sesame seed oil or nallennai on fresh green plaintain leaves with the
koottu and
kuzhambu is considered heaven!
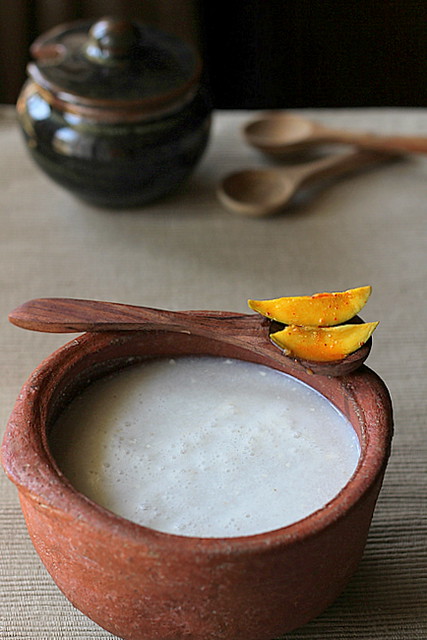
According to the folks of the state and the elders in the family, 'Kambu saadham' is regarded as a food which generates heat in the human body and the reserves of the cold meal diluted with buttermilk believed to neutralise the heat and in turn serves as the best body coolers in summer!
This, infact is the
Kambu Koozh which is again a healthy option and quite common summer street-side drink stored in earthern pots here!
Well, through this post I had tried my best to recreate the same traditional way I had witnessed years back, in a lesser quantity, which I personally make at home regularly. The woody flavour of the
Kambu compliments with the bronze utensil in which it is prepared and I had stuck on the same authentic way, though elaborate!
The recipe is divided into 2 parts for the ease to follow
Part 1- Preparation of the Kambu Saadham
and
Part 2 - Preparation of the Kambu Koozh from the above meal
The step by step method, I hope, will guide through even a beginner!
Part 1- Preparation of the Cumbu or Kambu Saadham
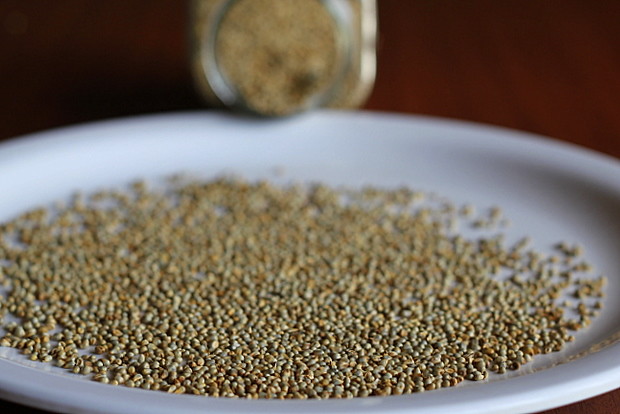
Pearl Millet or Bajra commonly known as
Cumbu or
Kambu in Tamil

Wash 1 large cup of
Kambu well in running water and drain on a kitchen towel.

Pulse in a mixie while the grains are not completely dry but a little moist. Like rice grains,this way it's easier to powder!
I have broken the grains in quick shots / pulse mode. Repeat once or twice..

..till you get 'an overall coarse' powder.

Do not disturb the powder sticking to the mixie lid, if you have any.
Even if you dont see the
finest powder sticking to the inside of the lid, don't bother.
Sieve the rest..

to separate the coarse, fibrous grains

The prime lens let me down a bit here by focussing only on the finest powder :)(sticking to the insides of the mixie lid, said earlier). Hope you can make out the difference between the three!

The coarse powder should get into the pot first. Add little by little in a thick bottommed bronze pot of boiling water (4 cups :- the cup used to measure the grains earlier)

Stir it along as it boils and gets cooked

After 15-20 minutes in medium flame. Notice the cooked grains.You can feel it and ascertain between your finger tips.

Stir along the
finer power now. You can alternatively close the pot with a lid and keep the flame to minimum and let it cook. But see to it you use a bronze or heavy pot as I have used here as it tends to stick to the bottom if left unattended.

Always have an eye on the pot and stir once every couple of minutes.

This wont take long. Between 5-10 minutes and is cooked.

The finest powder should go last. Keep stirring as you add along with 3/4 tsp of salt.

The porridge gets thicker in about 5-8 minutes. Let it remain in the pot for 15 minutes till the piping heat subsides and the gruel gets thicker.

to a serving consistancy of
Kambu Saadham or the healthy millet meal!
Served with with spicy
Mochai- kathiri Kuzhambu and mild Murunga Thazhai ( drumstick leaves) koottu
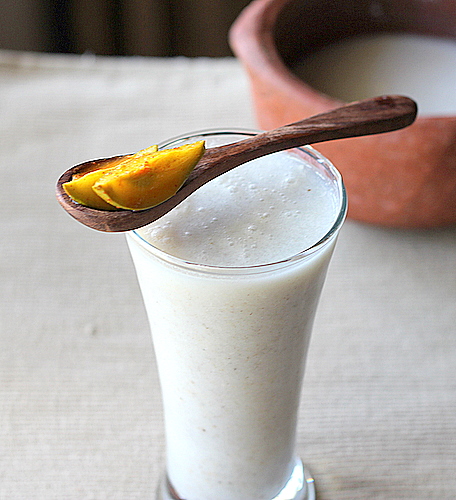
Part 2 - Preparation of the Cumbu or Kambu Koozh
The meal thus made is rolled into large balls and immersed in cold water. This method would have been effective in those days when they had no luxuries like refrigerators and the meal kept well for one or two days.
In fact these balls are the ones used to make the
Kambu Koozh.
The first part of the recipe is through and
all you have to do to make the
Koozh or the millet-buttermilk-porridge, is by whipping up,
2-3 serving spoons / tbsps of the above millet meal (cooled down to room temp or preserved as balls or refrigerated)
a cup of cold and sour curd + a cup of cold water
or
2 cups of cold and thin buttermilk
salt to taste
whip the above ingredients in your blender and serve cold in a tall glass.
This would serve two tall glasses.
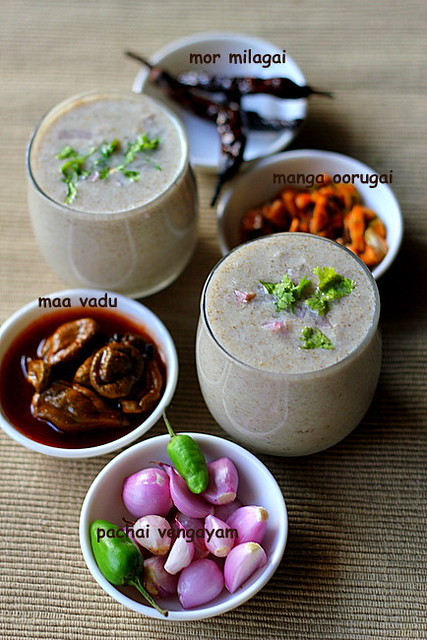
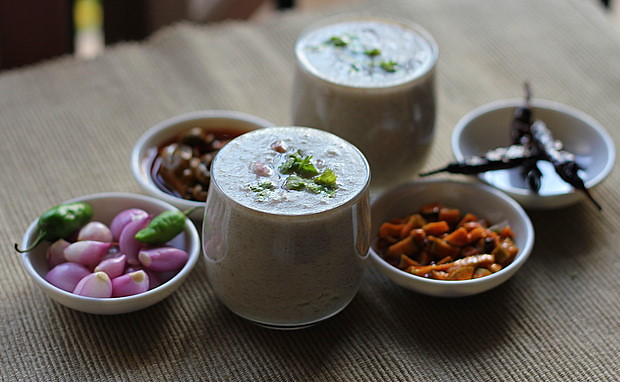
Kambu Koozh served with raw mango slices marinated in brine and chilly powder
Suggested accompaniments
Maavadu / tender mango pickle- recipe
here
Mangai oorugai / cut mango pickle- recipe
here
The Cold
Kambu Koozh topped with finely sliced onions and corainder leaves serves as the best body cooler on a summer noon!
Author's Note
Marking the fifth year of blogging I had wanted to make an exotic recipe post but rather ended up with an authentic post of the state. The past few days had been hectic with lots of travel and a bit of commitments which kept me occupied. Anyway I am happy that I could make this traditional Tamil recipe post, a step by step tutorial which anyone who loves the same can give a shot. These kind of posts gives me more satisfaction as a blogger!
and
Before I sign off let me thank from the bottom of my heart
My dear readers and followers for the staunch support you had been rendering for the past five years of my blogging!
Expecting the same from you all in future too :)
Loads of love,
Bharathy :)