Sunday, July 31, 2011

Picture(s) of the Week ~ Living room centre table


Since my living room holds the colours beige, brown and green, the centre table reflects the same.
I clicked these while (dusting the glass, to be true ;)) rearranging  the conchs and the potpourri, the usual stuff on the table.


Read More »

Tuesday, July 26, 2011

Idiyappam with Ishtoo


It always makes wonder how the name 'Ishtoo' got popular in Kerala and presume as an attempt to sound like the English, when they named this mild curry, Stew..probably!

Amma wanted to make idiyappam and ishtoo for breakfast, the dish which evokes the reminiscences of our childhood days, the day sis and me were busy packing off from Kottayam. She had a hard time on the day with unannounced power cuts and least help from her daughters ;), well, she never expects our help as well but later by the end of the day her maid turned up and promised solid help to make the dish, which turned out to be our 'pack-away dinner' in Ernakulam!

I managed to click a few pictures in the middle of packing and running up and down the town for the last minute shopping and today, exactly after 3 weeks, since we left home, I drafted the post and rang amma up for the recipe..


Kerala Idiyappam (Serves 4-6)

Ready made rice flour / idiyappa podi (She used Matha. Double Horse, Eastern and Nirapara are also good brands)- 1/2 kg
Boiling water- 3 1/2 - 4 cups (more or less) or as needed to make a soft dough.
Salt - 1/2 - 3/4 tsp or to taste
Grated coconut- 1 cup


Boil water in sauce pan and add to the flour in a large wide vessel while mixing to form a dough with the stem of a ladle or so. Add water little by little adding salt to the flour and knead to an ultimate soft dough.The amount of water varies according to the quality or the rice powder.


Lightly grease the idiyappam press mould and put in one portion of the dough. Sprinkle 1-2 tbsps of coconut shavings on a a piece of greased banana leaf. Press out the dough to form circular mounds over the shavings.


Place the leaf carefully on the perforated plate of the steamer..


Idiyappam stew 004

and steam for about 10 minutes till the iddappam is cooked; with the steamer closed with its lid :)
I badly wanted to capture the steam n oye oye, I made it!!


Idiyappam stands or an idli stand can be the substitutes to the perforated plate lined with banana leaf. A pressure cooker, without the weight, can be used for steaming instead of the traditional 'appachembu' or the steamer you see here.


Ensure idiyappam is cooked.


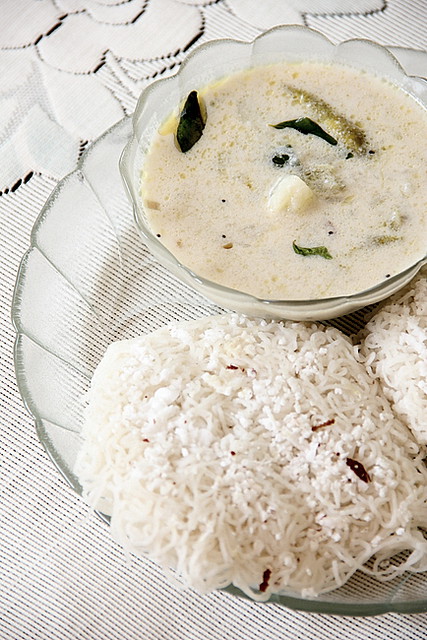
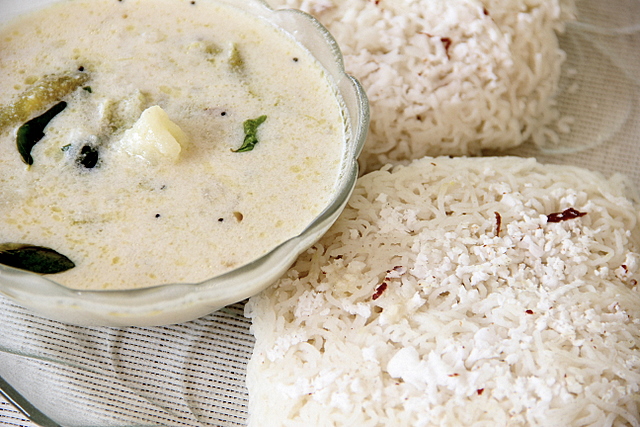
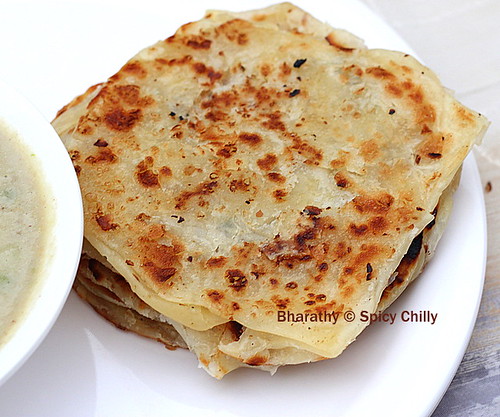
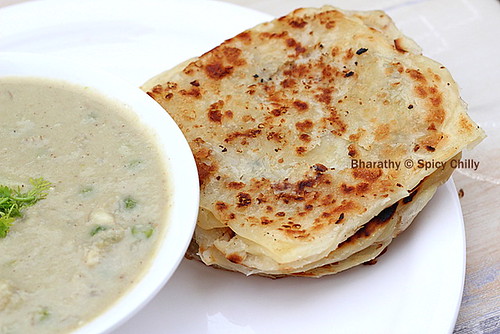
Topple gently on a tray or a flat plate and serve steaming hot with Potato Ishtoo.


Potato Ishtoo


To serve 4 , you need,

Potatoes - 4 medium, peeled & cubed
Big onions - 2 medium, cut into squared slices
Green chillies - 4 to 5, slit lengthwise

For the coconut milk,
Grated coconut - 4 cups, loosely packed. You may need 1 big or 2 small coconuts.

To season,
Coconut oil - 1 tbsp
Mustard seeds - 1/4 tsp
Finely minced shallots/small onions- 1-2 tsps
Curry leaves - 2 sprigs
Salt to taste

* Dried and liquid variants of coconut milk are widely available in the market, these days. Prepare thick/thin milk according to the package/can instructions . The traditional way of preparing coconut milk, added to the curry enhances the taste and flavour to a large extend and hence I always resort to this method!

Extraction of coconut milk

Place a half of the coconut shavings in the blender with about 100ml (1/2 cup) of warm water. Process for about 20 seconds. Repeat with the other half with another 100 ml. Strain the milk using a filter or a double layered cheese cloth. Squeeze to finish off extraction completely.The milk you thus get is the concentrated milk or the 'onnam pal'/ first extract. Set this aside in a separate bowl.

Repeat, with added 200 ml of water to the coconut. Pulse to strain out the second extract / 'rendam pal'.
Another 200 ml of water pulsed will result in the third extract / 'moonam pal'.


Combine 2nd and the 3rd extracts.You may have, more or less, 3 cups of milk. Transfer into pan and boil potato chunks in this.The liquid part should at least 2 inches above the pieces. Be careful not to bring to a complete boil but simmer instead, stirring every now and then. Add the onions, green chillies and salt let cook until soft. Do not bother much if the milk curdle a bit coz it's natural. Once the vegetables are cooked, switch off the stove and add the first concentrated extract.
Heat coconut oil in a separate pan, crackle mustard seeds, caramelise the minced onions, throw in the curry leaves. Pour this over the curry. Close with a lid until served with steamy idiyappams.

Variations- You can add pieces of carrots and minced ginger while simmering the vegetables, the original Ishtoo additions!We generally avoid both as they suppress the divine flavour of coconut milk.
You may avoid the seasoning part by drizzling the coconut oil and stirring in the curry leaves.

Ishtoo serves well with Appams too!
Read More »

Saturday, July 23, 2011

Picture of the Week ~ With Love from Singapore!


And I unpacked the very exclusive courier package I received from my sister ...

The products were supposedly meant for my daughter but should I say I conveniently flicked half of them? ;)

My son uses the black Google tee and the red one, my cousin sis.

Lush - I have totally fallen in love with this one.The seductive fragrance of this hair moisturiser stays for days!
Addictive Lush!

Have I ever told you that I'm a lip gloss person rather than a lip stick one? Well, this was sent for me and I am loving the 'Linda's beige!'. The L' Oreal Infallible Gloss stays on your lips making them supple, for a day!

The Gently Purify Gel is already with my daughter while the sensual amber is with me. Yet to use the Rice Extract Body Milk.

The Google, L'Oreal, B & BW, Body Shop, Thann and Lush all stand  inferior to her Love and Care!

Read More »

Tuesday, July 19, 2011

Veechu Parotta ~ plain & eggless ~ step by step recipe!


I wonder at times how this South Indian Tawa Bread got its name!
Did it acquire from Veesu ( a throw ) colloquially adapted as Veechu ?
It makes me thinking!

When I googled for this much common South Indian nan, surprisingly I ended up with a very few search results. I came across egg veechu parottas, stuffed ones and a few more but not even a single step by step whole recipe for the dish liked by many!

Posting the step by step of this one had not been easy. The oil smeared hands had to work on both the dough and the camera which made the task seriously difficult. Shanthi my on and off maid who is an expert in making parottas, helped me with the challenging veechu/veesu part. I wanted her to make me do the rest to inspire even the beginners!

I was much prompted to post this considering the google searchers who will definitely be in need of the recipe.

The ingredients are the same as the other Parotta (we call it surul /spiral parotta); flour, oil water and salt and so as the kneading and standing part. The difference calls in the folding after the veechu / veesu / throw!

Plain Veechu Parotta (eggless)

Yields 15
Serves 4-5

You need:

Maida / All purpose flour- 1/2 kg
Milk ( I use it instead of water)- 2 cups, more or less coz it depends on the quality of the maida
oil- 2 tsps, while kneading the flour
salt- 1 tsp
Oil- 1/4 cup for smearing the balls and drizzling while cooking (you may not use up fully)

Step by step method:


Sift maida to ensure there aren't any impurities (esp if you reside in India :))


Knead maida using milk/water, salt and oil (2 tsps)


 to a soft dough.


Let it stand for at least 2 hours. I made it rest for 5 full hours which gave the best results!


After 5 hours, take it out and knead on a smooth, clean oiled surface.


Pinch out into equal sized balls with your fist.Oil smeared fist makes the job easier.


Well, now you can see the 15 balls, which I could successfully 'fist' out ;). Smear oil over them.


Roll out each into thick pooris smearing oil liberally. Stack them as you see..


Roll out pooris as thin as you can. It's definitely not easy coz the dough springs back in.


 Now comes the 'Veechu' part. Throw out as you see, (ahh.. I'm losing words of explanation here cos I failed to do it ;))


once or twice to get thin sheet..


and even thinner. Don't worry if it gets torn here and there. Fold one side


followed by the opposite side


the other end


and the fourth end making it perfect!


Maida and oil makes the rolled out dough spring in further. So throw 3 at a time and cook immediately. The pooris are kept ready for this purpose of quick work!

Drizzle oil, liberally, while they bubble up, on the hot tawa..


Cook the other side. Do not turn them over and over as harder parottas would result.


Return them to your oil smeared counter and give them a quick press with your palms on the sides. This is just to separate the layers.


Serve hot with Vegetable Khurma or any curry of your choice.

IF YOU ARE LOOKING OUT FOR THE SURUL / SPIRAL PAROTTAS, CLICK HERE FOR THE STEP BY STEP RECIPE 

 Friends, please feel free to let me know whether the pictures open up well in this post.
 I'm receiving feedback lately that they don't or takes lots of time to show up.
Was wondering  since I have almost two dozens of  'em here! :)
Read More »

Monday, July 11, 2011

Tomato Onion Chutney


thakkali chutney and kovakka 036

Ripe red tomatoes blended with onions and sautéed to perfection will be the right definition for this heart warming chutney. Or if you are on the look out for a tomato chutney that fairs well with a week's shelf life I highly recommend to try this one..

Ingredients

Ripe tomatoes (less sour variety will be better) - 1/2 kg
Big onions - 3 nos or 1/4 kg, sliced thin lengthwise
Garlic - 5-6 cloves
Red chilly powder- 1 1/2 - 2 tbsp or acc to your spice level
Dhania/coriander powder- atbsp
Oil- 2-3 tbsps

To Season:

Oil- 1 tbsp
Mustard seeds
Hing / Kayapodi- 1/4 tsp
Curry leaves - 2 sprigs
Salt- to taste

Step by step method

thakkali chutney and kovakka 004

Dice tomatoes


thakkali chutney and kovakka 001

Sauté onions in 2-3 tbsp oil for a few minutes adding salt.


thakkali chutney and kovakka 008

Addition of salt accelerates caramelizing. Add garlic cloves. Continue until onions turn golden brown.


thakkali chutney and kovakka 014

Dump in the tomato pieces and cook.


thakkali chutney and kovakka 018

Yes, the tomatoes let out water while cooking and become pulpy. You need not add water at any point of  sautéing this chutney A bit of spluttering would happen which is quite normal. See to it you use a large kadai.


thakkali chutney and kovakka 023

Continue to sauté in medium flame for a few more minutes until the water evaporates and the tomato onion mixture gets mushy and cooked. Remove from fire.

Cool and blend to a smooth paste. Add the oil to season in the same kadai, splutter the mustard seeds followed by hing and curry leaves. Switch off the flame and add the powders (chilly powder and dhania).This is to prevent charring of the powders. Stir in the paste immediately, put on the flame to medium.Check salt. Remove from fire when the oil separates and the chutney thickens.

Serve warm with Dosa or Hot idlies drizzled with sesame seed oil. I love this that way :).Coconut oil fairs well too.

thakkali chutney and kovakka 034

  • Note:
  • Let the tomatoes be ripe and red. The chutney would have that red hot colour and tastes perfect.
  • The kadai you choose can be non-stick and large as spluttering happens towards the later end.
  • The chutney keeps well in fridge for 2 weeks or even more if sautéed well enough!
  • Add oil liberally ; upto 4 tbsps (this chutney demands a bit more oil ) during the first part of sautéing itself .Then only the oil separates well after the second part (seasoning).
  • Half of the total amount can be substituted with gingelly seed oil too.
  • This comfortably adapts both the Tamil and Kerala cuisine as  Thakkali Vengaya Chutney and  Thakkali Ulli Chammanthi :)
Read More »

Thursday, July 7, 2011

The Perfect Pound Cake


I simply loved the Perfect Pound Cake recipe,  the 'Sweet Punchers' had announced for the month.
The cake I started to bake as a teenager and that I make until now; probably the one I'd whipped up the most number of times...the simple vanilla or the tea cake I had learnt from my mom which calls for equal weights of the 4 major ingredients, flour, butter, eggs and sugar..

The measurements and method for the pound cake is slightly different, though...


and Hurray! WE baked the lovely, yummy, golden, cake, together to make it all the more special and sweeter! :)


Perfect Pound Cake
(Adapted from the The Cake Bible)

Ingredients


3 tablespoons Milk
3 large Eggs

1 ½ teaspoons vanilla
1 ½ cups sifted cake flour
¾ cup sugar
¾ teaspoon baking powder
¼ teaspoon salt
13 Tablespoons unsalted butter, softened [184 gms]


Directions
Preheat your oven to 350 F. Butter an 8 inch by 4 by 2.5 inch loaf pan, or any six cup loaf or fluted tube pan.
Lightly whisk together milk, eggs and vanilla in a medium bowl.
Place dry ingredients in a large bowl and mix on low speed for 30 seconds, until blended. Add the butter and half the egg mixture, and mix until dry ingredients are moistened. On medium speed, beat for one minute. This will aerate and develop the cake’s structure. Scrape down sides.

Add the remaining egg mixture in two batches, beating for 20 seconds between each addition. Scrape down sides.
Pour batter into prepared pan. Smooth surface with a spatula. Bake for 55-65 minutes (35-45 minutes if baking in a fluted tube pan), until a wooden toothpick inserted into the center comes out clean. Let cake cool on a rack in the pan for 10 minuets before inverting onto a greased wire rack. If using a loaf pan, flip the cake over so the top is up.
For making Cake flour at home - Take one cup of all purpose flour and remove 2 tbsp from it. Replace the 2 tbsp flour with cornflour and sift together 2-3 times.Cake flour is ready to use.


 I had badly wanted to bake the cake in loaf pans and cut into squares complaining about making in amma's round cake pan, but sis was more towards the quality of the cake rather than the shape :)


The power was going on and off during the beating part and the frothy dough had to wait for a long time to get into the hot oven while the power retrieved after 2 long hours!
Fortunately it didn't affect the texture of the cake!
 The soft, light and moist cake disappeared within 10 minutes after the photography session by the sisters, much before tea time :)

Read More »
Related Posts Plugin for WordPress, Blogger...