Monday, August 29, 2011

Vella vadai, the sweet Indian donuts!


"Athai, how much uzhundu (urad dal) shall I add to make vella vadai?"             (Athai = ma in law)

"Hmm may be kal padi"                                                 (Kal padi - the 250 ml traditional measuring cup)

"And vellam?"                                                                                                             (vellam = jaggery)

"ahmm....you have to add it along until you can shape them into vadais.."

*^%#**$^*


Ma in law makes 'Vella vadai' really well. Ask her the recipe, she stammers!

The most difficult source to extract a recipe from, is thus her! ;) Hope she doesn't read this! ;)

I am not at all a fan of these sweet vadais but had wanted to try this and blog for quite some time. These cuties are traditional and probably disappearing from our tea tables ! I had googled to find the recipe a while ago but was not happy with the results.

Just 2 major ingredients and all you have to be careful is with the measurements and the consistency, meaning more chances of a mess up!

So, how did I make them, finally?

 Ma was off to the nearby town for a couple of days and I was asked to take care  of ammayi and the house..
On another note, I dint utter a word about her Godhumai jira  put up in the site but I knew Ammayi simply loves these vadais.

Our maid Azhakamma, fondly addressed as Aggu, who serves my in-laws for the past 2 decades, came to my support..:). But she was again confused with the measurements but we decided to do it together and amaze Athai ( for me, a chance for a loud evil laugh, contented to have taken that sweet revenge) when she got back home ;)

Aggu asked me to soak a cup of urad dal, crush a ball of jaggery and weigh, while she grinds in the Aattu kal or the grinding stone. She'll keep on adding as ma in law mentioned, and I should weigh the remaining jaggery finally after the grinding. That way, we could measure the right amount of jaggery that went in.
Love you Aggu! :)


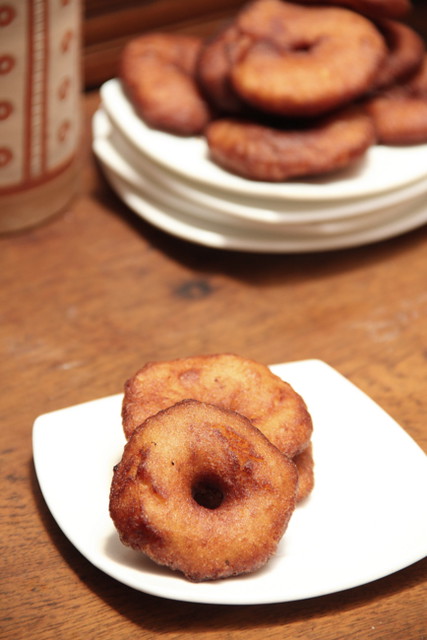
Here's how we made, that yielded 20 medium sized vadais.

 Vella Vadai / Urad Dal Jaggery Dumplings


Ingredients:

Whole urad dal / Uruttu uzhunthu- 1 cup or 150 gms
Jaggery/Vellam- 120gms or 3/4 cup after ground coarsely and measured
Pinch of salt
Oil- to deep fry


Method:


Wash and soak urad dal for not more than 1/2 an hour.


Drain water completely. Spread on a dry towel and wipe gently to remove water sticking to it.


The Aattu kal (grinding stone) was washed and wiped with a towel to remove moisture.
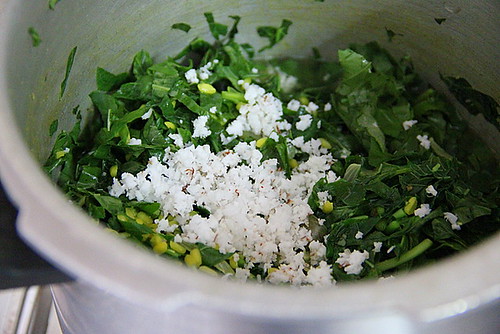
The urad dal and the jaggery was ground together without adding even a drop of water!


Half way through..


Salt was added and the stone was rolled for a few more times for the final sticky sweet dough.


which was transferred to a flat bowl.


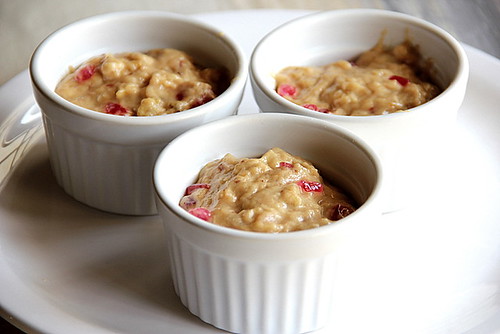
Now, shape them one by one into vadais with fingers dipped in water.


And deep fry in hot oil.


The oil should not be smoking hot. Keep the flame to minimum and


 fry 1 or 2 at a time. The vadais cook very fast and attain the brown colour. So take care not to over cook / brown them.


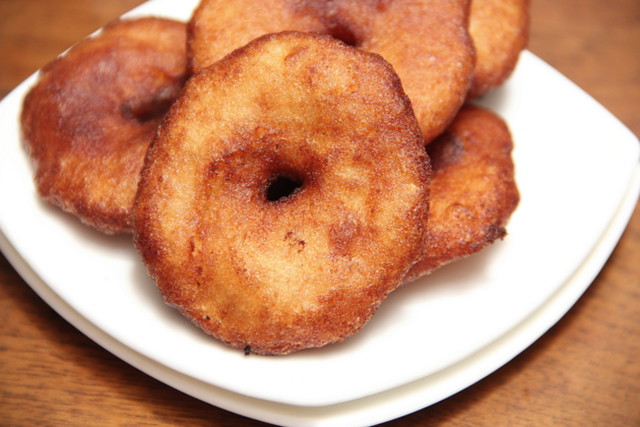
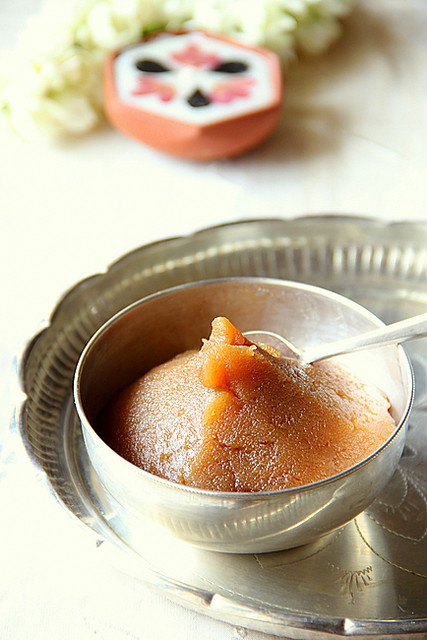
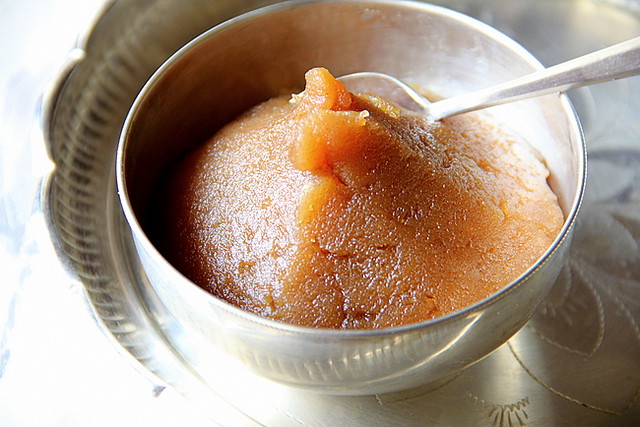
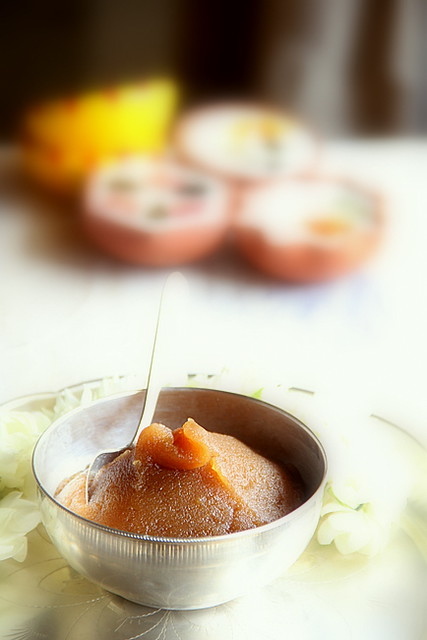
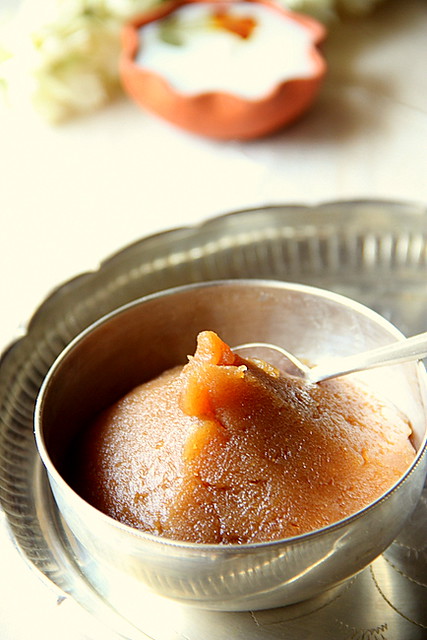
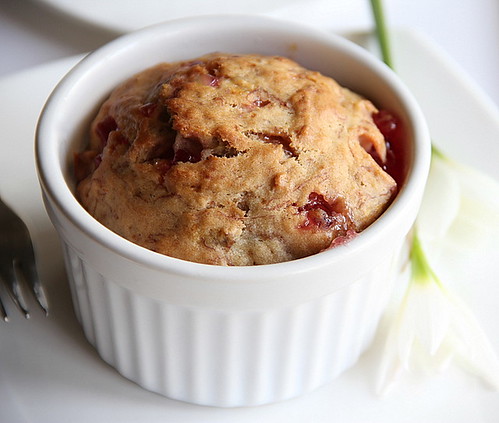
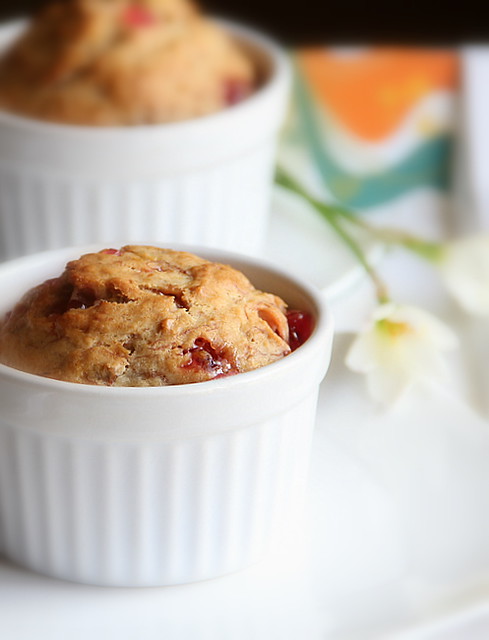
They look almost like medhu vadai or the spicy urad dal vadais but have a deeper brown hue due to the added jaggery, if you can't make out the real colour here.


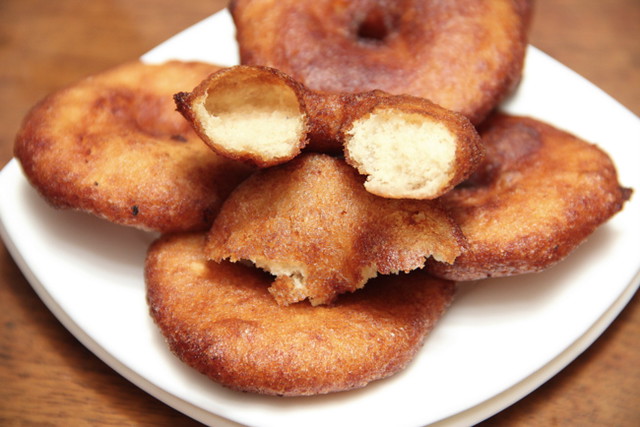
A peep into the soft insides.


Obviously Aggu did the grinding part. She never let me try in a mixie and I really have no idea how these vadias would turn out if done so. Would appreciate if anyone would try the grinding part in a mixie and let me know about the outcome.

Preparing this post demanded 2 whole days as I had to do the editing, uploading and typing whenever I could grab some time in the system at my in law's place, amidst the commitments.

Clicking the publish button while Athai is savouring my vadais....of course me with those devilish grins ;)
(if you don't understand the reason of these wicked smiles, you have missed the intro, please scroll up and read again)

:)
Read More »

Monday, August 22, 2011

Godhumai Jira / Instant Wheat Flour Halwa


I

mastered 'Godhumai Jira' from 'Ammayi, my husband's maternal Grandma. Years back, as a newly wed she amazed me each time she made this sweet in a jiffy for the unexpected guests who would simply admire the heavenly taste!

By typing 'mastered' I mean it!  Many of my husband's relatives learnt the recipe from 'Ammayi' but were not able to come out like hers when they tried. I admit I'd failed at least half a dozen times ;) ;thanks to the inspiring spider and the king story which never let me surrender and propelled me for years until I made it perfect!

'Ammayi', on the other hand, claims to have learnt the recipe verbally from one of her family friends. Trying to source out the cuisine I had pestered her with all sorts of queries pertaining region, whether she was a Gujarathi, Marathi, Rajasthani etc. She continues to say "Vadakkathi" meaning North Indian!

So invariably this belongs to North India. Friends, any idea to which state this belongs, please? :)

My in-laws had named this 'Godhumai Jira 'which again confuses me, especially with the latter part. Why 'Jira'?
The speciality of this sweet is that it calls for just 4 ingredients, wheat flour, ghee, sugar and water with no added colours, flavours, dried fruits or nuts! Still it tastes Heaven!

I had made up my mind, ever posted, I should make it a real elaborate step by step post to make it as easiest as possible for my readers, It seems to be elaborate, take my words, the time span between the image no:1, just below  and image no:19 with the final product is not more than 5 minutes!!


Ingredients for Wheat flour Halwa

Whole wheat flour/ Atta - 1/2 cup
Ghee- 1/2 cup (same amount as wheat flour...never compromise the quantity)
Sugar - 3/4 cup (slightly lesser than two parts of flour)
Water - 1 cup + about 1/4 cup ( 2 1/4 parts of flour)

Clear?? :)

So here we go.....you can never flaw with these anyway :)


Heat ghee / clarified butter in one of your non stick pans.
I used fresh homemade cow's ghee, amma had sent over :)    ( Thanx girls, for tolerating a bit of bragging :))


I used a shallow nonstick pan and lesser ratio of ingredients for the pictorial and please go ahead with your wider deeper pans. For beginners I strongly suggest to start with minimum quantity, say, 1/4 cup of wheat flour and 1/4 cup of ghee like I am doing here!


Add wheat flour to the heated ghee


Ah! while you place the pan to heat ghee, place the pan of water (flour : water =  1 : 2 1/4) simultaneously on the adjacent stove over medium flame.


Blend ghee + atta well. It should be watery and not thicker than you see here. This is important!


Keeping flame to minimum, stir the mixture continuously.


You can see the colour changing while the flour gets cooked in ghee


This will take 2-3 minutes (if you have used 1/4 cup of flour and ghee) and you see the flour attaining a deeper brown hue with the distinct aroma of wheat + ghee all around you!


The water must have reached the rolling boiling stage now. Make sure you don't let it boil and evaporate as we might mess up with the ratio

Ah! seems now I am burning the mix!!


Yes, this is where you are supposed to reach with the wheat and ghee part. I removed it from fire and brought it under daylight to show you the actual colour.


You don't have to put off the stove as I did and can dump sugar..


..followed by the boiling water. Be careful as you see the mix rising up a bit with a hissing sound and settling down the next second, since you are using the boiling water. Be careful with the very hot water too.

 This was the moment I was desperately in need of a third hand and envied our Hindu Gods.... was literally struggling with hot water, spatula and the camera set to auto shoot..


This stage reaches after 2 seconds from the previous. I had to put off the stove after my struggle to click a decent picture :)


The same stage for a closer shot. While you mix, ensure there are no lumps formed. It is safer to put off  fire for a few seconds until you blend the mixture well.


Keep the flame low and stir.


Aw! Seems I had both the hood lamps on and the color is confusing!


Yes! Put off one and note the consistency and the colour. This stage is reached within a minute after you mix the flour, ghee and boiling water.


Within seconds you can see the whole thing forming into a smooth glossy mass, leaving sides of the pan with a wonderful aroma. Interesting, na? :)


Ah! there you go! heave a deep sigh of relief, you've made it!
Put off fire. Transfer to another bowl and leave it cool a bit. The halwa will be really hot!


Enjoy the warm bowl of sweet. There are no added colours . No added flavours either!


Ammayi, the greatest cook of our family, is almost bedridden with limited mobility. She can no more amaze her guests with godumai jira but still loves to have it in spite of her ever shooting blood-sugar levels :)


Updated :

Hi Bharathy, this is what we Maharashtrians call Kankecha Shira meaning Wheat flour shira, probably "jira" is a mispronounced "shira". It is a rural specialty rustled up for surprise visitors. Me having grown up in Mumbai had never tasted this but a friend from Nagpur made it for me and said it is very common in the countryside. The golden roasting in ghee is the key to a good shira.

Thank you Anjali for your valuable info!


According to Kool Kitchen, Wheat Flour Sheera ( कणकेचा शीरा) is a traditional Maharashtrian sweet, usually served as ‘Prasad’ for Satyanarayanpuja.


Read More »

Wednesday, August 17, 2011

Keerai Koottu / Spinach and Moong dal Curry


Keerai Kootu is the curry I make at least once a week. Manathakkali leaves, mulai keerai or red spinach find their way into the dal making it a wholesome comfort dish for both him and me.

Past week I made a quick visit to our ancestral bungalow in our native village to see the healthy Thandu keerai being grown in the backyard. Now, who can resist the perfect organic home grown greens!
I had them plucked right away to make this flavourful koottu the very next day!


I'm not sure about the English name for this variety and will be helpful if anyone could help me find it :)

Updated : 'Thandu Keerai' in English is Amaranth Tender or Amaranth Leaves. Thanks Layaa and Zareena for the information.

So here we go with the recipe..

Yields- the vessel photographed. Serves a small family.

Get ready with :

Spinach - A bunch (you can use any variety,  ensured stems cook soft. Or else use the leaves. I used 'Thandu Keerai'  leaves)
Moong dal- dry roasted- 1/3 cup, packed
Small onions, chopped- 1 tbsp
Sambhar powder- 1/4 tsp
Turmeric powder- 2 fat pinches
Jeera powder- 1/2 tsp
Freshly grated coconut- 1 tbsp(optional)
Salt- to taste

** To Season,

Ghee /oil - 2 tsps
Mustard seeds and urad dal- 1/4 tsp each
Dried red chilly-1, broken into 3 pieces.


Method :


Chop off the roots, clean, wash and drain the spinach. Chop the leaves and the tender stems.


Boil 2 cups of water in a 3 ltr pressure cooker. Give the roasted moong dal a quick rinse and stir along the boiling water in the cooker.


Add sambhar, jeera and turmeric powders along with chopped onions and salt. Stir to combine.


 Layer the spinach on top and keeping the flame to'sim', wilt down the leaves. Stir gently.


 Stir in grated coconut.


Close the cooker with its lid and increase the flame to 'medium'. Place the weight after you see the steam coming out.


Cook until 1-2 whistles. Remove and let the steam vent off by itself. Open the lid, check salt and season.
To season, heat oil in a separate kadai, splutter the mustard seeds, brown the urad dal followed by the red chillies.


Serve warm with steamed rice  with a dollop of ghee or with Indian breads.


Varations:

If the koottu turns out watery, add rice powder and simmer, to thicken.

**You can add a tbsp of minced onions and a clove of minced garlic while seasoning the curry.You may need to caramelize onions and garlic and should use 1-1/2 tbsps of oil / ghee.  It enhances the flavour much.

I generally avoid this as my family loves the mild flavour of onions cooked along the dal and the greens. Garlic can also be cooked along instead of seasoning. Moreover, the extra oil is avoided this way.

Non pressure cooker method:

I generally follow the pressure cooker method as the dal and greens demand more time when cooked direct due to the hardness of water in my place. You may not use a pressure cooker otherwise. Just cook the dal directly and when it's half cooked add the powders and onions followed the spinach and cook until soft.Add the coconut and simmer before seasoning.

Read More »

Saturday, August 13, 2011

Picture of the week ~ The fruit seller


To bring freedom and opportunity to the common man, to the peasants and workers of India; to fight and end poverty and ignorance and disease; to build up a prosperous, democratic and progressive nation, and to create social, economic and political institutions which will ensure justice and fullness of life to every man and woman...                              ~Tryst with Destiny - Speech by Jawaharlal Nehru


She still comes to my doorsteps twice a week. She has lived past 7 decades and toils still...

Do we really live in an Independent Nation?

Let us join our hands and work together to create a better nation!


Happy Independence Day!


Read More »

Tuesday, August 9, 2011

Strawberry Banana Muffins


It's quite strange that I wonder myself  when I come across an ingredient on the shelves of the supermarket, I regularly go in abundance, but when I plan to bake something and visit the shop, it will be 'out of stock!'

I came across cute boxes of fresh strawberries the previous night when Sweet punch for August was announced. The next visit when I went searching for it, the regular apologies, "sorry mam, we sold the last lot out, it's out of season!"

The husband was requested to get it  while he made a visit to Madurai.
No luck.

I kept the deadline on 7th Aug, to let the search continue until then.
My high hopes to get them from Chennai kept me optimistic coz I never wanted to compromise on my fancies, with the fresh sexy red fruits placed on the background with the  focused muffins on the fore shots. I neither wanted to substitute any other fruit for my favourite berries.

When Renuka came to know about my search, she offered the dried candied fruits which she was holding behind for me, silently in her diet shop next street!
This is what friends are for ;)

The deadline is over and here I am for them!


Strawberry Banana Muffins Recipe:
Adapted from Joy of Baking
Makes 12 regular sized muffins

1/2 cup (1 stick) (113 grams) unsalted butter, melted
2 large eggs, lightly beaten
1 teaspoon (4 grams) pure vanilla extract
2 large ripe bananas, mashed (about 1 cup)
1 cup (240 ml) fresh strawberries (cut into bite sized pieces)
2 1/4 cups (295 grams) all-purpose flour
3/4 cup (160 grams) light brown sugar
1 1/2 teaspoons baking powder
1/4 teaspoon baking soda
1 teaspoon (4 grams) ground cinnamon
1/2 teaspoon (2.5 grams) salt


 Preheat oven to 350 degrees F (177 degrees C). Place the oven rack in the center of the oven. Line a 12 cup muffin pan with paper liners or lightly butter or spray the muffin cups with a vegetable spray.

In a small saucepan melt the butter. Let cool to room temperature.

In a medium sized bowl whisk together the eggs, vanilla extract and mashed banana. Add the melted butter and stir to combine.

In another large bowl combine the flour, sugar, baking powder, baking soda, cinnamon, and salt. Gently fold in the berries, making sure they are coated with flour. (This helps to prevent the berries from sinking during baking.) Add the wet ingredients to the dry ingredients and stir only until the ingredients are just combined. Do not over mix the batter or tough muffins will result.

Divide the batter evenly among the 12 muffin cups, using two spoons or an ice cream scoop. Place in the oven and bake until a tester inserted in the center of a muffin comes out clean, about 20 to 25 minutes. Transfer to a wire rack to cool. Can be stored for a few days at room temperature.


 I halved the recipe and made 3 giant sized muffins which demanded a baking time of 35 minutes.
The combined flavour of  bananas, strawberries, vanilla and cinnamon was heaven!
Read More »
Related Posts Plugin for WordPress, Blogger...