Thursday, September 29, 2011

Mutton Stew


While the masala rich non vegetarian gravies top my list of favourites, this mildly spiced side dish, which has its origin from the Christian homes in my native place, goes last.

This was sent over by one of amma's friends in Kottayam while we were holidaying a couple of months back and I managed to get the recipe from her while clicking away the dish.

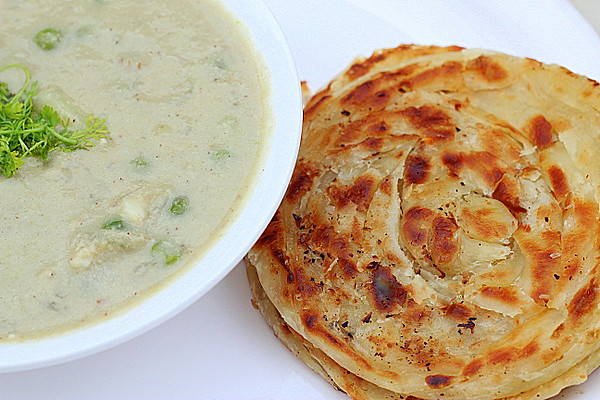
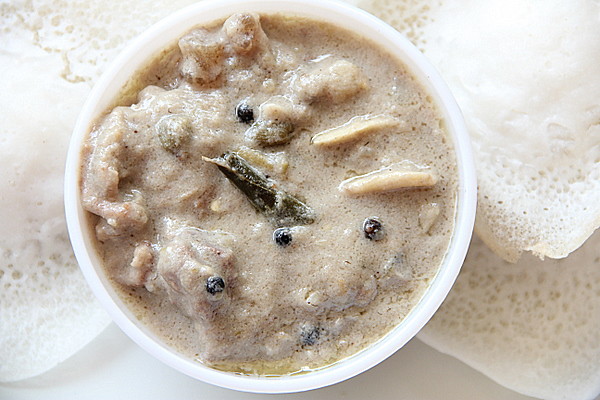
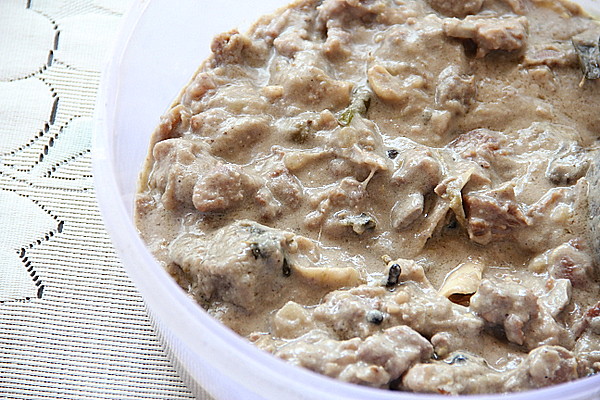
If you like soft juicy meat all drenched in rich coconut milk with a breezy flavour of spices, then this is for you!


Mutton Stew
You need:

1.  Mutton-1/2 kg
     Vinegar - 1-2 tsps
     Salt
     Stock water from the above cooked meat- 1 cup


2.   To be sautéed in order:

     Coconut Oil - 4 tbsps or 1/4 cup
     Cinnamon - a 1 inch piece
     Cardamom-  4no
     Cloves - 8 nos
     Whole black pepper corns-10-12 nos
     Big onion-   2 nos, sliced lengthwise
     Ginger -       a 1/2 " piece, julienned
     Garlic cloves- 5, julienned
     Green chillies-10-12 nos, slit lengthwise until 3/4th (do not slit apart completely)
     Curry leaves- 2 sprigs
     Potatoes-3 medium, peeled and cut into 12 cubes in total (each to 4 pcs)
     Maida / cornflour-1 tsp
     Thick Coconut Milk - 1 1/2 cups
     Salt- to taste


Method:


Pressure cook mutton with vinegar, salt and enough water (1 cup  +/-) so as to yield 1 cup of stock water after it gets cooked soft.

Heat oil in a pan, add cinnamon,cardamom, cloves, pepper in order and sauté onions till translucent along with ginger and garlic juliennes. Throw in green chillies followed by the curry leaves and sauté for a few more seconds. Pour in the stock water. While it boils add the potato cubes and cook until done. Transfer cooked mutton along with. Simmer for a few more minutes adding maida / cornflour (made a paste with a tbsp of water). Switch off and stir the thick coconut milk gently to combine.Do not boil the curry after this stage as the coconut milk tends to curdle.


Check salt and serve warm with Kerala Appams!


Note:


Always use tender meat which cooks well.You can substitute veal as well.
If  you end up with less than stock water than recquired, use water. If you have more of stock water, boil to evaporate the excess while cooking the vegetables (onion, chilles & potatoes).
Or else, add cornflour / maida a little more which would thicken the curry.
Remember, the stew thickens as it cools down.

Read More »

Monday, September 26, 2011

Parotta (step by step recipe)


Remember the Veechu Parotta post a few months back? These parottas also were made the same day and time intended for a separate post.

  Now, let's see what wiki has to say about this one.

A Parotta or Barotta, is a common layered flat bread of Southern India. This is not to be confused with the North Indian Paratha. Parottas are usually available in restaurants and road side shops across Kerala, Karnataka, Tamil Nadu and and the Middle East (introduced by the South Indians. It is also served in marriage and religious festival and feasts. It is prepared with Maida and Oil/Ghee by beating the mixture into thin layers and later forming a round bread with the thin layers.
Usually, parottas are relished with vegetable kuruma and Onion Rings (in case of Veg restaurants) and chicken, mutton or beef saalna (a spicy sauce in non-vegetarian restaurants).

Coming back, the ingredients of  Surul / Spiral Parotta or the Parotta here and Veechu Parotta are the same; flour, oil water and salt and so as the kneading and standing part. The difference calls in the folding after the throw.


Parotta 

Yields 15
Serves 4-5

You need:

Maida / All purpose flour- 1/2 kg
Milk ( I use it instead of water)- 2 cups, more or less coz it depends on the quality of the maida
oil- 2 tsps, while kneading the flour
salt- 1 tsp
Oil- 1/4 cup for smearing the balls and drizzling while cooking (you may not use up fully)

Step by step method:


Sift maida to ensure there aren't any impurities (esp if you reside in India :))


Knead maida using milk/water, salt and oil (2 tsps)


 to a soft dough.


Let it stand for at least 2 hours. I made it rest for 5 full hours which gave the best results!


After 5 hours, take it out and knead on a smooth, clean oiled surface.


Pinch out into equal sized balls with your fist.Oil smeared fist makes the job easier.


Well, now you can see the 15 balls, which I could successfully 'fist' out ;). Smear oil over them.


Roll out each into thick pooris smearing oil liberally. Stack them as you see..


Roll out pooris as thin as you can. It's definitely not easy coz the dough springs back in.


 Now comes the 'most difficult part. Throw over the counter to spread out as you see, ( ahh.. I'm losing words of explanation here cos I failed to do it ;))


once or twice to get thin sheet. Hold on to one side of the sheet with your right hand and lift up from the counter or gather one end of the sheet. You may see the dough dangling like a kerchief. You dont have to pleat.


Just roll around starting from one end finishing tucking the other end on the oil smeared  counter.


Repeat the process.


The air gets trapped in while you do this proving the perfect elasticity of the dough.


Spread gently using the oil smeared rolling pin.


You can also use your fingers to spread them out. Transfer on to the hot tawa as soon as  you spread them. Drizzle oil and cook for a few seconds.


Flip over and cook the other side.


Be careful with the flame. It can be kept to medium. Do not turn them over and over as harder parottas would result.


Return the cooked ones to the counter and stacking (2-3 at a  time),  press with your palms quickly and continuously from  both the opposite sides, inwards, for about 5-6 times.
Just like you clap hands but having the hot parathas on the counter, flat, in between. :)


You can see the layers separating, which makes the Parottas unique from the other Indian flat tawa breads!


  I served them hot with Vegetable Khurma.
Read More »

Saturday, September 24, 2011

Picture of the week ~ In search of food...


Exposure                  0.003 sec (1/320)
Aperture                  f/6.3
Focal Length            135 mm
Lens                        EF-S18-135mm f/3.5-5.6 IS

Read More »

Monday, September 19, 2011

Maangai Oorugai / Mango Pickle


Well, this post is finally meant to do some justice to my blog's title after a while. Bakes, chocolatey cookies, muffins and Indian sweets had been dominating the space lately here as you could see.

Sample the pickle and you can judge the talent of the cook. Yeah! a good cook makes a perfect South Indian pickle, the one which doesn't turn stale for a longer time and tastes perfect throughout. I look upon my in laws as perfectionists when it comes to this art. The way they make pickles however make me feel I'm still in baby steps and got a long way to go!

I do try pickles which have already peeped in this blog and this one was made and sent over by my sis in law right after we got back home finishing our US visit this summer. The pickle was perfect for our everyday lunch while we finished off with lots of yogurt as the summer was still on.

I clicked a picture, last month when it was almost getting over, fast and today I called up my sis in law for the recipe as I sincerely felt should be a keeper!

This recipe  actually suits best for avakkai which is prepared in larger quantities, meant as an year long preserve with amazing shelf life but here she has substituted regular sour cut mangoes. The recipe is surprisingly simple as well!

Maangai Oorugai

Yields a small bottle

You need:

Sour variety raw mango cut into small cubes - A cup
Red chilly powder- 2 -3 tsps
Mustard seeds - A tspful
Garlic cloves- small- 5-6, minced
Sesame seed /gingelly oil / nallennai - 1/4 - 1/2 cup (almost half the measure of  mangoes)
Table salt- 1- 1 1/2 tsp, more or less or to taste (depends on the sourness of the mango)
*Fenugreek seeds / venthayam- 1/4 tsp

Method :

**Sundry mustard seeds spread on a flat tray, the previous day you intend to make the pickle. Powder in a mixie or hand pound as the quantity is less, the next day. Separate and remove the skin of the seeds using a bit of  wide netted sieve.

Now all you have to do is mix all the ingredients raw gently in a glass or ceramic bowl to combine. How much easier than a pickle can get? No heating of any ingredient, as simple as that! It would be dry just after you mix it but the water oozes out within a couple of days.

The pickle kept well for 2 whole months under refrigeration.


Author's Notes 


1. This recipe is meant originally for Aavakai Orugai as mentioned earlier and the cut mangoes are a substitution here.

2. Generally a kilogram of aavakkai is pickled. So naturally the amount of the other ingredients also shoot up accordingly. About half cup of mustard seeds are used, which are sun dried and powdered the following day. Sun drying is highly recommended for the seeds for such larger amounts of pickling.
** If you cannot  sundry, you can heat the seeds in a hot kadai (do not roast or fry) before powdering.

3. * Whole fenugreek seeds are used in the above recipe. For larger amounts of pickling, dry roast the seeds in a kadai until they turn dark red and powder which can be mixed along with the other ingredients.

4. Refrigerate the pickle stored in a glass jar / bottle for prolonged shelf life.

Looking forward to summer;  the season of mangoes and hoping to come up with the authentic Aavakkai Oorugai, soon! :)

Read More »

Monday, September 12, 2011

Chocolate Almond Biscotti


I had always wanted to try baking these traditional western cuties but had never attempted until the Sweet Punch team announced the month's recipe as Biscotti!

Chocolate Almond Biscotti have two distinguishing features; its long, thin, curved shape and its crisp and crunchy texture. Since most biscotti contain nuts, with almonds being the most popular, these Chocolate Almond Biscotti are just about perfect as they contain both almonds and chunks of chocolate!

The Chocolate Almond Biscotti's crisp and crunchy texture comes from baking the cookie twice, which is different from most North American cookies. This second baking draws out the biscotti's moisture and how long they are baked determines how crisp and crunchy they will be. Biscotti are made by first forming the dough into a log and baking until firm. The log is cooled slightly and then cut into thin slices. The slices are baked until crisp which has the added bonus of giving them a long shelf life.


Chocolate Almond Biscotti Recipe:
Adapted from Joy of Baking

You Need:

3/4 cup (110 grams) blanched whole almonds, toasted and chopped coarsely

2/3 cup (135 grams) granulated white sugar

2 large eggs

1 teaspoon pure vanilla extract

1 teaspoon baking powder

1/4 teaspoon salt

1 3/4 cups (225 grams) all-purpose flour

4 ounces (110 grams) semi-sweet or bittersweet chocolate, chopped in 1/2 inch (1.25 cm) pieces (can use chocolate chips)


Method:

  • Preheat oven to 350 degrees F (180 degrees C). Toast almonds for 8-10 minutes or until lightly browned and fragrant. Let cool and then chop coarsely. Set aside.
  • Line a baking sheet with parchment paper. Set aside.
  • In bowl of your electric mixer (or with a hand mixer), beat the sugar and eggs on high speed until thick, pale, and fluffy (about 5 minutes). (When you slowly raise the beaters the batter will fall back into the bowl in slow ribbons.) At this point beat in the vanilla extract. In a separate bowl, whisk together the flour, baking powder and salt. Add to the egg mixture and beat until combined. Fold in the chopped almonds and chocolate.
  • Transfer the dough to your parchment lined baking sheet and form into a log, about 12 inches (30 cm) long and 3 1/2 inches (9 cm) wide. You may have to dampen your hands to form the log as the dough is quite sticky. Bake for 25 minutes, or until firm to the touch. Remove from oven and let cool on a wire rack for about 10 minutes.
  • Reduce oven temperature to 325 degrees F (165 degrees C). Transfer the log to a cutting board and cut into 3/4 inch (2 cm) slices, on the diagonal. Place the biscotti, cut side down, on the baking sheet. Bake for about 10 minutes, turn slices over, and bake for another 10 minutes or until golden brown. Remove from oven and let cool. Store in an airtight container.


The recipe is fool absolutely proof! I halved the recipe and came up with 12 biscotti.
Enjoying the crispy biscotti, biting into soft chocolate chunks and roasted almonds with a steaming cup of coffee is simply irresistible, which I am doing right now, while typing this!

I will be baking them again and again!


Read More »

Saturday, September 10, 2011

Mathanga Vanpayar Erisseri


Erisseri is yet another must served curry for Onasadya, a mildly spiced flavourful side dish with the perfect combination of Vanpayar and Mathanga that tickles the taste buds of not only a Keralite, but anyone who savours it!
I had wanted to make Erisseri before Onam, but then got really occupied with weddings and travel. I am typing this in a haste while the curry is getting cooked on the stove simultaneously preparing to go to my husband's native town in a couple of hours for a wedding reception again...and excuse me if you find  typo errors in the post :)


Mathanga Vanpayar Erisseri - Yellow Pumpkin with Red gram and Coconut Curry
Serves: a small family

You need:

2 cups (about 200-220 gms) *peeled and cleaned mathanga /yellow pumpkin cubes
A handful of vanpayar / Red gram

To grind to a paste,

1/2 cup grated coconut
1/2 tsp jeerakam /cumin seeds
1/4 tsp turmeric powder
1/2 tsp red chilli powder
1/2 tsp mallipodi / coriander powder
A large clove of garlic

The Seasoning,

2-3 tbsp coconut oil
1/2 cup grated coconut
1/2 tsp mustard seeds
1/4 tsp urad dal
1-2 red chillies broken into 2-3 pieces each
2 sprigs of curry leaves

1) Soak the red gram in luke warm water for at least an hour. Cook in a pan with water and a little salt until they are soft but not mushy.

2) In the meanwhile * remove the seeds of the pumpkin, peel the skin , wash and cut into 1 inch cubes. Dump the  pieces along the cooked gram with. Check the water content . It should be the same level or a cm more than the pieces. Cook for a few minutes until they are just done.

3) Grind the grated coconut and cumin seeds and the powders given in the, "to grind to a paste list" to a thick paste.

4) Add the ground paste to the cooked gram and pumpkin and mix gently keeping the flame low. Let it simmer for about minutes. Erisseri is a thicker side dish but don't worry if the curry is watery. It gets thicker while cooling down or else simmer on low flame for a few more minutes to evaporate the excess water. But be careful with the added water at each step. If it's too thick, gently stir in little by little.

5) Heat 1 tbsp of coconut oil in a separate kadai, pop the mustard seeds followed by the urad dal and red chillies. Mix well and pour over the curry.

6) In the same kadai, heat again2 tbsps of the remaining coconut oil and 1/2 cup grated coconut and  fry on low flame till crispy and dark brown.Be careful not to burn it. Addition of roasted coconut and curry leaves is something you should never skip and is highly suggested to bring out the signature flavour of the erissery. Top this on the curry and mix gently before served with warm steamed rice.

The Curry goes well with Indian breads too. I serve them with Chapathis as well.


 Onashamsakal to all my dear readers!
Read More »
Related Posts Plugin for WordPress, Blogger...