Showing posts with label Almond. Show all posts

Tuesday, November 22, 2016

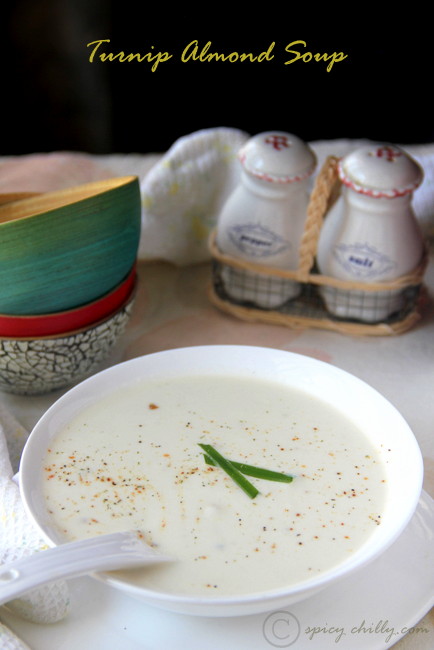
Turnip and Almond Soup


I had been in a mid blogger's crisis past week, just blank about the recipe I should blog next. Sometimes the same block hits me differently. The pictures would be hosted, the recipe drafted and all scheduled, but the introductory part for the post remain unwritten! Weird, but true! :)

Considering my regular readers' choice put up in my FB page, this was handed down by one of my friends, Mythily. I accepted to blog readily, since I have no many soup recipes up in my space.
Well, coming to this recipe, it's a heartwarming soup with an exciting combination of a root vegetable, nut and a grass to flavour, rounded off with some dairy; a perfect one bowl meal for the weather shift; fall to winter!


Turnip and Almond Soup
Serves 3
Prep time - 15 minutes
Cooking time - 10 minutes
Total time needed -  less than 30 minutes


You Need: 

Turnip - skin peeled and cubed into 1/2 inch pieces - one 250 ml cup heaped OR 200gms
Almonds- 10 ( blanched, peeled and ground to a fine paste )
Butter - 2 tbsps
Garlic cloves- 3 medium sized
Green chilly - A one inch pieces or 1/2 a chilly
Water (for the soup) - 1/2 cup + 1/2 cup
Lemon grass- 2-3 one inch blades, stripped
Low fat milk- 250 ml

Method:


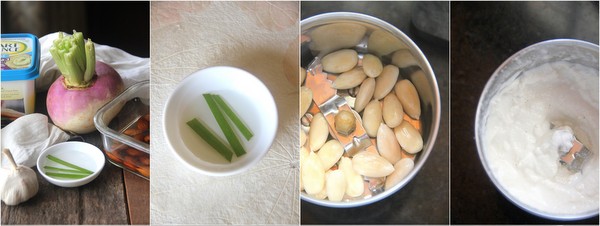
Have the ingredients all at one place. Infuse lemon grass in a tbsp of warm water and rest for 10 minutes. Grind the blanched and peeled almonds to a fine paste. Keep aside.


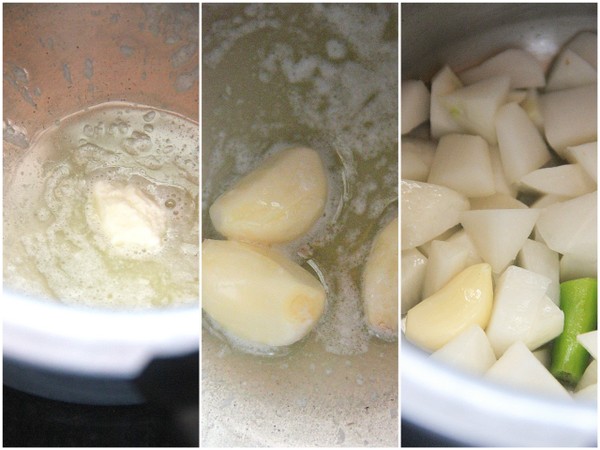
Heat a pressure cooker body, melt butter, sauté garlic and green chilly bits followed by the turnip chunks. Take care to do the whole thing in low-medium heat. We don't want the butter to turn really into ghee in high heat! Add 1/2 cup of water, bring to a boil and close with the lid.


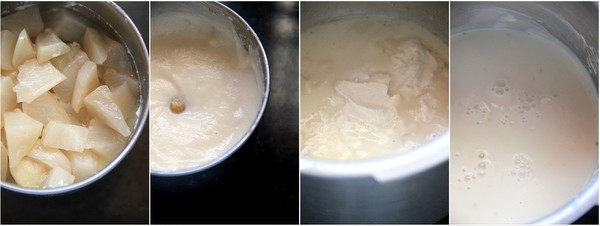
Cook until 4-5 whistles, according to your pressure cooker timing. We want the vegetables well cooked. Cool and grind the whole thing to a smooth paste.
Transfer the above ground vegetables, almond paste, remaining 1/2 cup water and milk and bring the soup to a gentle boil adding salt. Switch off. Add the lemon grass infused water (discard the leaves) and stir to combine.
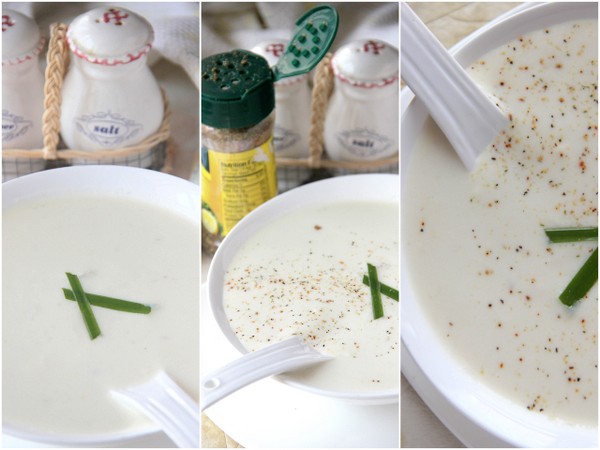
Season with pepper.


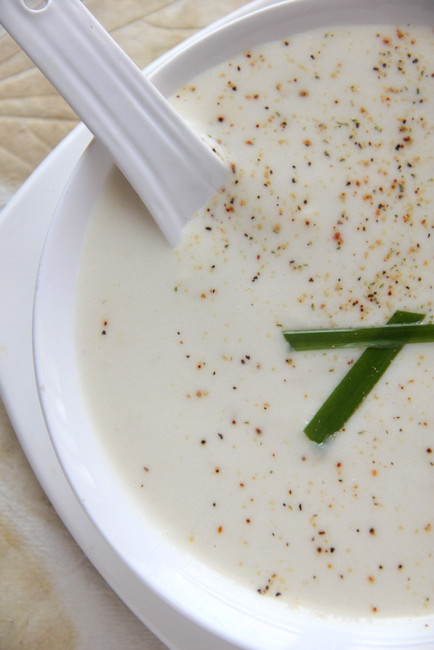
      I seasoned the warm earthy soup, with  Mrs. Dash, to add some zing.


Notes:

You can be versatile with the recipe. Try adding bits of ginger along while sautéing garlic.
Addition of chopped onions (bulbs of spring onions) can bring about an interesting twist.
Whole bay leaves instead of lemon grass can impart a different flavour. You may need to discard the leaves after pressure cooking.

This is a very healthy and nourishing soup, with the goodness of turnips and almonds!

Thanks for the recipe and the suggestions, Mythily. This post is dedicated to you!


Read More »

Tuesday, December 24, 2013

Bienenstich Kuchen (German Bee Sting Cake)


Bienenstich Kuchen


This month marks 12 months of baking breads together and given that’s it’s also a season when there’s a lot of festive baking done in parts of the country and the world, Aparna thought we could bake something special this month. And the choice falls for Bienenstich Kuchen or what’s also known as the German Bee Sting Cake!
Bienenstich is not really a bread but a traditional German sweet yeasted cake that has a baked on topping of crunchy almond toffee-like layer and filled with a vanilla pastry cream. Bienenstich is traditionally eaten as dessert and also served with tea or coffee.
Bienenstich means “bee sting” in German and probably got its name from the honey flavoured topping that it typical of this yeasted cake. There are however some interesting stories connected to it. One story is that the German baker who was creating this recipe came across a bee (possibly attracted by the honey) and was stung by it and decided to name the cake after the incident!
Another story is that a group of German bakers stopped invaders from entering a neighbouring village, sometime in the 15th century, by throwing beehives at them. IN order to celebrate their victory, they created the original version of the Bienenstich.


The Bienenstich is made with enriched brioche-like dough that’s typical for yeasted cakes which means that it contains a lot of butter, some milk and eggs. I have reduced the egg to one in the recipe. If you do use eggs you can use one more (total of 2 eggs) but you might need to add one or two tbsps. more of flour to the dough. On the other hand if you don’t use eggs, please leave it out. It will make a slight difference to the texture but not too much.
This yeasted cake is typically filled with pastry cream which is a mix of custard and whipped cream. I have used an egg-free version that uses custard powder but feel free to use your preferred recipe for custard using eggs.
You may also like to use butter cream, Bavarian Cream or Diplomat Cream. Remember the cake is a bit heavy so your filling should not be runny or too soft or it will not be able to carry the weight of the upper cake layer. You can also add fruit (strawberry, kiwi, mango, etc) to your “cream” layer even though this is not traditional.


Bienenstich Kuchen


I have baked my Bienenstich in ramekins and served individually but you can also bake it in a round or a square tin and cut it out into squares like we do with brownies.

One of the problems of this yeasted cake is making sure the filling is strong enough to take the weight of the upper layer. The other problem is cutting the Bienenstich into slices or squares without the filling squishing out ad making a mess of everything.
The first problem can be taken care of by using a filling that will hold up and not using too much filling. The whipped cream can be stabilized with cornstarch (or agar or gelatin if you use it). You can always thing the remaining fillng and serve it with the Bienestich as a sauce.
The second problem can be taken care of by placing the lower layer of the cake on the serving plate and then makinge a collar around it with a double layer of parchment paper that should be a little taller than the height of your finished Bienenstich. Now spread the filling over the lower layer evenly.
Then pre-cut your upper almond toffee layer into slices or squares depending on the shape of your Bienenstich. Now place the slices/ squares on top of the filling so it looks like the top layer is whole. Refrigerate this for at least a couple of hours before serving. When ready to serve, remove the parchment collar, and use the slices/ squares as a guide and cut through the filling right to the bottom.

Note: If you cannot find sliced almonds where you live (as in my case), you can make them at home. They will not be as thin as the store-bough version but I personally prefer my home made variety.

Blanch almonds by dropping them in just boiled hot water (not in boiling water, but boiling water that has just been taken off the heat). If you boil them, they will cook and become soft. Let them sit in the water for about 5 minutes. Then drain the water off and rinse once in cold water. Strain well. The skins of the almonds should feel a little loose and look wrinkled now. Pinch each almond at the broad end with thumb and forefinger and the skin should slip off easily.
Let the almonds dry out on a kitchen towel in an airy place for about half an hour. Then lay each almond down on its flat side and, using a sharp knife, slice as thinly as you can. There you have your sliced almonds.


Bienenstich Kuchen


BienenstichKuchen (German Bee Sting Cake)
To serve 6-8
Recipe Source- Aparna 

Ingredients:

For the Pastry Cream Filling:
250ml milk (I used 3%)
3tbsp sugar
3 tbsp vanilla flavoured custard powder
200 ml cream (I used 40% fat)
1 tbsp corn-starch

For the Dough:

1/4 cup milk (I used 3%)
100gm butter, at room temperature
2 cups all-purpose flour
2 tbsp sugar
1 egg
3/4 tsp salt
1 1/4 tsp instant yeast

For the Honey-Almond Topping:

50 gm butter
1/3 cup sugar
2 tbsp honey
1 tsp vanilla extract
2/3 cup almonds, sliced* (see Note above)

Method:

Bienenstich Kuchen

Make the custard for the filling first. This can be made the previous day and refrigerated till required.
Keep aside 1/4 cup of milk, and put the remaining milk and the sugar in pan. Over medium heat, bring this to a boil while stirring frequently to dissolve the sugar. In the meanwhile, dissolve the custard powder in the 1/4 cup of milk. Add this in a stream, to the boiling milk and keep whisking so that no lumps are formed.
Keep whisking until the custard becomes very thick. Take the pan off the heat and let the custard cool to room temperature. Whisk it on and off so it stays smooth. If it does become lumpy after cooling, use a hand blender to make it smooth. Transfer to a bowl, cover and refrigerate.
Once you are ready to fill the Bienenstich, whip 200ml of cream till soft peaks form. Then add the corn-starch and whip till it forms stiff peaks. Whisk the custard to make sure it is smooth. Gently fold the cream into the custard. If you feel it is too soft, refrigerate for a couple of hours and then use.


Bienenstich Kuchen

To make the dough, heat the milk until it is quite hot but not boiling. Cut the butter into pieces and add to the milk, stirring it until the better melts completely. Let it cool a little.
In the meanwhile, put the flour, sugar, salt and the yeast in the bowl of your processor. Run a couple of times to mix well and then add the egg (leave the egg out if you don’t use it). Run again till the egg has also mixed well. Now add the butter-milk mixture (it should be warm, not hot) and the then knead till it forms a smooth and soft (loose) brioche-like dough that’s just short of sticky. It should come way from the sides of the bowl and be easy to handle.
Shape the dough into a ball and place it in a bowl. Cover loosely and let it rise for about 1 1/2 to 2 hours. This dough will rise quite well but not to double or as much as your regular bread dough.

Deflate the dough, and shape again to a smooth ball. Place it in a8”spring form cake tin lined with parchment. It is important to do this otherwise the topping will make the bread/ cake sticky and difficult to unmould. Flatten the dough a little, pressing down lightly so that the dough fits the cake tin. It doesn’t matter if its not touching the sides like batter does. Let it rise for about 30 to 45 minutes. It will not rise very much and look a little puffy.


Bienenstich Kuchen

Prepare the topping while the dough rises. Melt the butter, sugar, honey and vanilla in a small pan, over medium heat. Keep stirring frequently and it will start bubbling up. Let it cook for about 3 minutes or so until it turns to a light beige colour. Add the sliced almonds, and stir well till the almonds are well coated. Take the pan off the heat and let it cool a bit. The mixture will become quite thick.


Bienenstich Kuchen

Now get ready to bake the bread/ cake. Once the dough has risen, use a spoon take bits if the topping (it will be quite thick, like a sticky fudge) and distribute it uniformly over the surface. If there are small gaps they will get covered once the bread/ cake is baking.


Bienenstich Kuchen

Bake at 180C (350F) for about 25 to 35 minutes until the top is golden brown and bubbling. A cake tester through the centre should come out clean. Let the cake cool in the pan for abpout 15 minutes. Then gently loosen the sides with a spatula and unmould. Let it cool completely on a rack.


Bienenstich Kuchen

When it has cooled completely, slice the cake into two equal layers carefully, using a very sharp knife. Spread the pastry cream on the lower layer and top with the upper layer and refrigerate till ready to serve.

Bienenstich Kuchen


Read More »

Saturday, December 15, 2012

Thumbprint Cookies


My son loves anything jam-centred. He has them as a meal apart snacking them. Surprisingly he wanted cookies instead of cakes this Christmas and I found myself searching for a simple cookie recipe of his kind.

"Thumbprint Cookies are a very popular holiday cookie. They are made with a shortbread-like dough that is formed into balls and then rolled in either finely chopped nuts or dried coconut. The name 'thumbprint' comes from the fact you use your "thumb" to make an indentation into each ball of dough and then fill it with jam."
Read More »

Monday, September 12, 2011

Chocolate Almond Biscotti


I had always wanted to try baking these traditional western cuties but had never attempted until the Sweet Punch team announced the month's recipe as Biscotti!

Chocolate Almond Biscotti have two distinguishing features; its long, thin, curved shape and its crisp and crunchy texture. Since most biscotti contain nuts, with almonds being the most popular, these Chocolate Almond Biscotti are just about perfect as they contain both almonds and chunks of chocolate!

The Chocolate Almond Biscotti's crisp and crunchy texture comes from baking the cookie twice, which is different from most North American cookies. This second baking draws out the biscotti's moisture and how long they are baked determines how crisp and crunchy they will be. Biscotti are made by first forming the dough into a log and baking until firm. The log is cooled slightly and then cut into thin slices. The slices are baked until crisp which has the added bonus of giving them a long shelf life.


Chocolate Almond Biscotti Recipe:
Adapted from Joy of Baking

You Need:

3/4 cup (110 grams) blanched whole almonds, toasted and chopped coarsely

2/3 cup (135 grams) granulated white sugar

2 large eggs

1 teaspoon pure vanilla extract

1 teaspoon baking powder

1/4 teaspoon salt

1 3/4 cups (225 grams) all-purpose flour

4 ounces (110 grams) semi-sweet or bittersweet chocolate, chopped in 1/2 inch (1.25 cm) pieces (can use chocolate chips)


Method:

  • Preheat oven to 350 degrees F (180 degrees C). Toast almonds for 8-10 minutes or until lightly browned and fragrant. Let cool and then chop coarsely. Set aside.
  • Line a baking sheet with parchment paper. Set aside.
  • In bowl of your electric mixer (or with a hand mixer), beat the sugar and eggs on high speed until thick, pale, and fluffy (about 5 minutes). (When you slowly raise the beaters the batter will fall back into the bowl in slow ribbons.) At this point beat in the vanilla extract. In a separate bowl, whisk together the flour, baking powder and salt. Add to the egg mixture and beat until combined. Fold in the chopped almonds and chocolate.
  • Transfer the dough to your parchment lined baking sheet and form into a log, about 12 inches (30 cm) long and 3 1/2 inches (9 cm) wide. You may have to dampen your hands to form the log as the dough is quite sticky. Bake for 25 minutes, or until firm to the touch. Remove from oven and let cool on a wire rack for about 10 minutes.
  • Reduce oven temperature to 325 degrees F (165 degrees C). Transfer the log to a cutting board and cut into 3/4 inch (2 cm) slices, on the diagonal. Place the biscotti, cut side down, on the baking sheet. Bake for about 10 minutes, turn slices over, and bake for another 10 minutes or until golden brown. Remove from oven and let cool. Store in an airtight container.


The recipe is fool absolutely proof! I halved the recipe and came up with 12 biscotti.
Enjoying the crispy biscotti, biting into soft chocolate chunks and roasted almonds with a steaming cup of coffee is simply irresistible, which I am doing right now, while typing this!

I will be baking them again and again!


Read More »

Sunday, March 27, 2011

Almond Carrot Kheer


With the sun blazing down and summer almost here there's no better way to beat the heat other than with fresh and frothy homemade smoothies, shakes and fruit juices.  ...... humble butter milk we love you too!

Ground almonds cooked in milk flavoured with cardamom along with a touch of saffron, the 'carroty' taste  complimenting the nutty flavour, this kheer serves best any time of the day, and is for sure a perfect nourishing summer drink which you can prepare in less than half an hour!

Almond Carrot Kheer (fills 4 large glasses)

*Fat free milk- 1 litre/ 1000ml
Almonds-large- 35 nos
Carrot- 1 big
Sugar- 10-12 tsps (or as per your taste)
Cardamom seeds, powdered-1/2 tsp or to flavour
Saffron strands- a few

*Fat free milk is preferred as whole milk suppresses the natural taste of almonds. Kheer made with light milk is more comforting too.


Soak almonds in hot water ; just enough to keep them immersed for 30 minutes. Peel off skin one by one and grind to a smoothest paste adding a little milk. Peel the skin of  the carrot, cut into chunks and pressure cook. Cool and grind to a smooth paste. If you have the cooked water, do not worry! Stir in both the pastes into that until blended. If there isn't any left over water, just blend the pastes in half cup of milk reserved from the one litre.
Add sugar to the milk and bring to boil. Reduce the flame and blend in the pastes stirring continuously. Simmer for 5 minutes to let the nuts cook. If you feel the kheer too thick, stir along 1/2 a cup of milk or so to bring to the right consistency. Switch off the flame, stir in cardamom and serve hot topped with saffron strands. The kheer turns thicker while cooling.


I love it chilled, though! It was so soothing and refreshing that I ended up having a whole chilled jug thoroughout the day, skipping meals ;).
Read More »

Monday, March 7, 2011

Whole Wheat Almond Eggless Cookies


S imple, crunchy, flavorful and addictively delicious is an understatement for these cookies you see here. Tight hugs to Sweet Punch team for the wonderful choice!

Take my words, bake them and you will never regret munching on this very much 'Indianish' Cookies!

Recipe Source- Manjula's Kitchen

Ingredients (to make 24 cookies)
  • 1 cup whole wheat flour
  • 1/2 cup sugar
  • 1/4 teaspoon salt
  • 1/4 cup sliced almonds
  • 1/2 teaspoon cardamom powder, ground coarsely 
  • 1/2 cup unsalted butter (8 tablespoons or 4oz)
  • About 2 tablespoons of milk or as needed


Method 


  1. Pre heat the oven to 360 degree F.
  2. In a bowl, mix the dry ingredients; flour, sugar, salt, sliced almonds and cardamom powder well.
  3. Next add soft butter and milk to the flour mixture to make dough. Dough should be very soft.
  4. Divide the dough into about 24 equal parts and make them into balls.
  5. Press each ball between your palms lightly; every piece should be about 1/2” in thickness.
  6. Place the dough balls on an ungreased cookie sheet about inch a part.
  7. Bake the cookies for about 18 minutes or until cookies are lightly golden brown.
  8. After they are done remove the cookie sheet from the oven. Let the cookies cool down for two to three minutes before taking them off the cookie sheet.


The pic up is the 2nd batch of cookies baked with a higher temp and deliberately over browned. They were crunchier and tastier :)


            The changes made from the original recipe:-

            1. No added milk.The homemade butter was soft enough and dint call for the milk. On the contrary the dough was sticky and I had to knead in 2 tbsps of wheat flour to make it right.

            2. Used half cup,scant, granulated sugar, which was powdered and kneaded in. Still the cookies were towards the sweeter side. 1/4 cup sugar will be ideal for a cup of heaped flour, coz I prefer my cookies less sweet! (The original recipe calls for fine granulated sugar)
          
             3. The oven temp was set to 210 C (a high temp for anyone but not to my old fashioned conv one :)) and the baking time needed was 15-18 minutes, the edges have browned but the cookies tasted great that way.The original recipe says 180 C for 18 min. So the baking time varies according to the temp and type of oven you use.

            4. I made 36 cookies inspite of the changes and will be baking this again and again and again unlike Manjula who does just once in the video ;)

Read More »
Related Posts Plugin for WordPress, Blogger...