Friday, October 28, 2011

Kutti Kathrikkai Podi Curry / Stuffed & Stir-fried Baby Brinjals


I learnt this recipe from my ma in law. This had been a special dish reserved for special lunches as the process was considered elaborate in a joint family. We used to stuff  more than 50 brinjals, yet we enjoyed doing this as we always did this together and never felt tiring as we would have thought about it before we started.
The dish turns out perfect every time we make it and unlike the other dishes, this one is relished from the youngest till the oldest in the family! Even the brinjal haters enjoy this!

Preparation of the dish is never an elaborate one, if you start with a dozen or even two of those baby brinjals. The powder can be made prior and can be stored until you make the stir-fry and hence this becomes as easy as any vegetable side dish you make any day!

 You Need: 
(to serve a family of four)


Baby brinjals /kutty kathrikkai -25 numbers (weighs330 gms / about 3/4 lbs)

For the powder for stuffing, (yields 1/2 cup)

Oil- a tsp
Coriander seeds / kothamalli -  1/4 cup scant
Bengal gram dal / kadalai paruppu - 1/4 cup scant
Red chillies/ kayntha milagai 4-5 numbers
Curry leaves / karuveppilai - 2 sprigs
Cumin seeds-1/4 tsp (optional) I didn't add

To Season,

1-2 tbsps of oil
1/2 tsp mustard seeds
3/4 tsp urad dal
2-3 tbsps of thinly sliced small onions
2 sprigs of curry leaves

Now, for the step by step method...


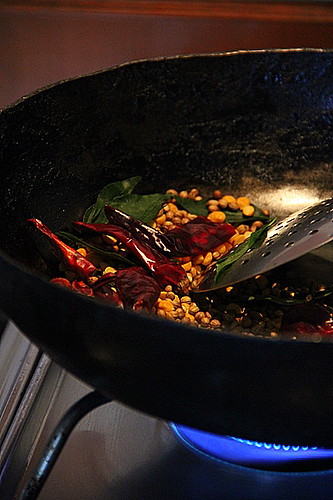
Drizzle a tsp of oil in your thick bottomed wok and fry the coriander seeds, dal, chillies and curry leaves all added together  in medium heat ...


until done.


Pulse into a coarse powder adding salt.
Ah!well, I used my Ammikkallu to powder as I had a power shut down while making lunch!
I can't tell you how much I hate doing this but had no other go even while I accept the perfectness of hand pounded powders!


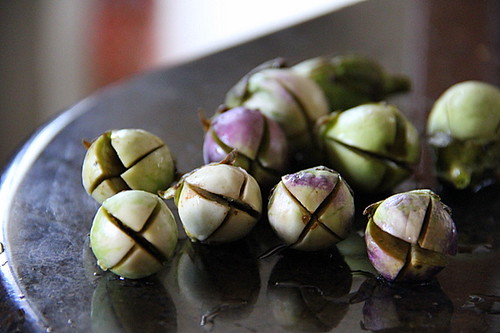
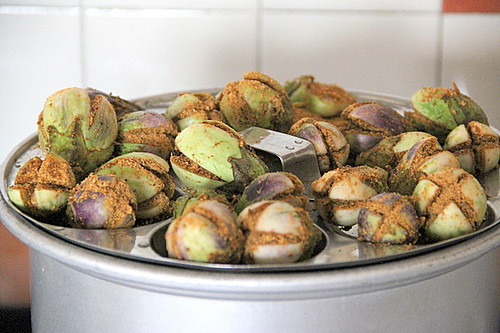
So now, you need to slit the baby brinjals as you see here. Check for worms while you do this and slice away the portions if you come across any!


Stuff the slits with the powder, as much as you can.


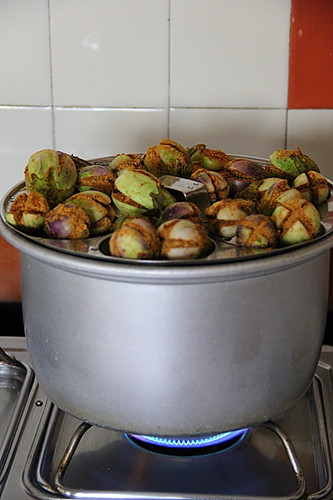
and arrange them carefully on your steamer plate with the brinjals placed horizontally or the stuffed sides slightly up. I used my rice cooker and idly steamer plate combo for steam cooking.


 Close with an appropriate lid to lock the steam while cooking.


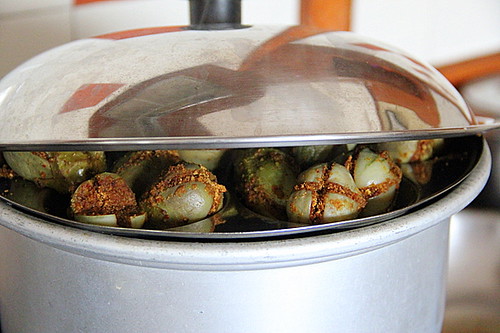
Check after 10 minutes. The brinjals should have turned soft


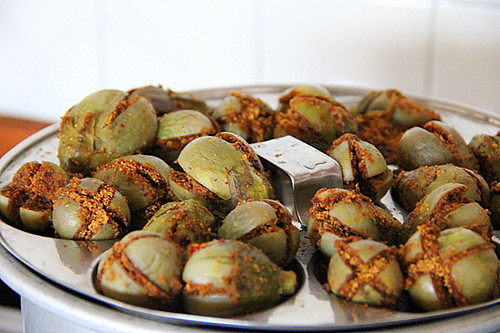
and the purple ones would have turned ash green as well. Scroll up to that picture where I've arranged them before steaming and you can notice the difference in colour!


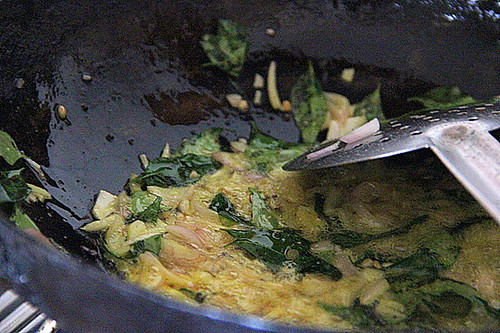
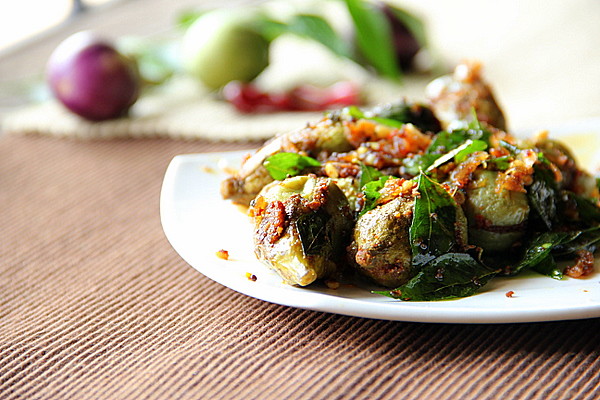
For seasoning, heat oil in the previous wok, crackle the mustard seeds, brown the urad dal, sauté onions and curry leaves and stir in the brinjals sautéing for a minute . The caramelized onions and the curry leaves coat the brinjals and the flavour is irresistible!


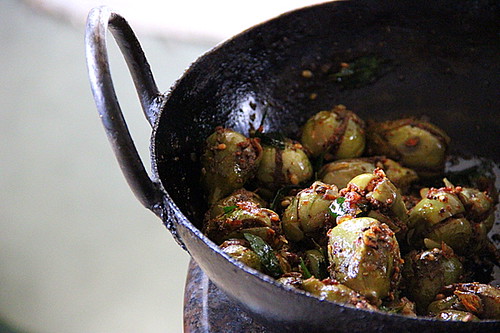
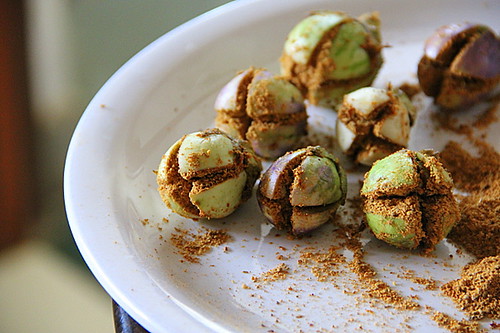
The stove top brinjals could not be photographed well while seasoning because of poor lighting. So here's a quick view of the finished dish placed on the counter edge.


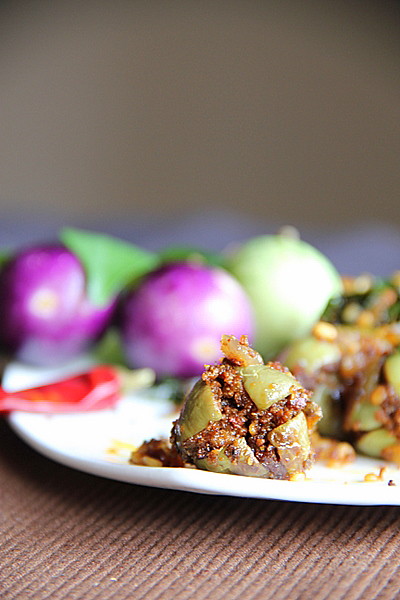
Stuffed brinjals are served best with steamed rice and Indian breads!


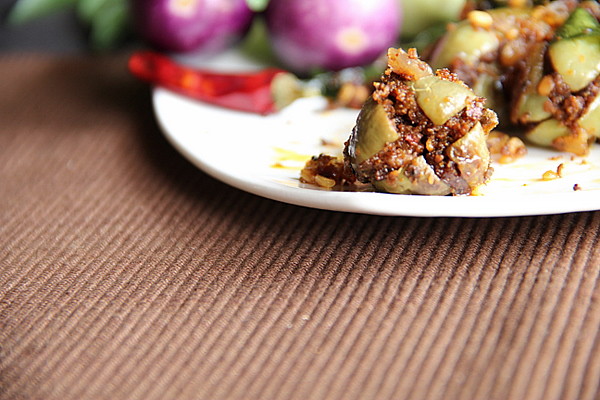
But did I tell you I love to have them as a starter drenched in hot and sweet tomato chilly ketchup??

I could hardly wait to devour this one as soon the shot got over! ;)

Read More »

Saturday, October 22, 2011

For the hands that cooked, for the fingers that typed...


It has been almost 4 years since I am into blogging and 2 years since I'd commercialised the space. I had my plans to buy a DSLR when the amount hit 1000 USD, but when that was gifted by the dear husband earlier this month, I chose to buy a (my very first) diamond ring, to beautify the hands that cooked and the fingers that typed...


Place where the ring was purchased ~ GRT, Chennai
Particulars of the ring ~ 21 stones, 0.49 cents in total, cost 46.500 INR.
Read More »

Friday, October 21, 2011

100 Yummy Diwali Sweet Recipes ~ The e-book by Indus Ladies!


The special e-book by Indus ladies is now available for a for a free download here.
The book will surely be much beneficial for the readers, world wide, who are on the look out for a sweet or a dessert recipe, this Diwali!
 My contribution, Godhumai Jira is included in the e-book along with the other tongue ticking recipes apt for the season.


Thanks again to the team for all those wonderful efforts put in!

Read More »

Monday, October 17, 2011

Eggless Wheat Cake (with Jaggery)


She looked sweet!
When I happened to see her first on the 'food fest' grounds a couple of months back, this girl was busy presenting her goodies on the plate. I watched her with a smile from some distance which she couldn't have possibly realised! Herself and me were among the 50 competitors who contested for the cooking contest arranged by the 'food fest' team.The ingredient for the day was 'wheat flour' (with which we were supposed to make something sweet!) Among the crowd of competitors she invariably stood out which would have probably caught my eyes!

I saw her working in a hurried way as she had to work with the toppings making it look perfect before we were asked to place the trays on the table for judgement. Since I was through with my wheat flour almond cookies, I walked up and offered help to this sweet girl who was already with her finishing touches.
I told her I would mind her handbags and things while she presents her plate on the table and she smiled and thanked me while hurrying off.

While we were waiting for the judge to arrive, we had a chat. She introduced herself as Namrata and talked about her native place. We talked as if we knew for ages.
After the judgement got over we exchanged what we made. She happily shared her wheat flour cake and chocolate bombs while I shared my cookies.

The cake as well as the chocolate bombs were simply irresistible!
I absolutely loved the cake which was moist and light with a different taste and much "Indianish".She said it was eggless and had jaggery instead of sugar!
I had always thought of a cake sweetened with jaggery and here I am with a perfect recipe!
I got excited and couldn't wait to grab the recipe from her!


Eggless Wheat Cake

Ingredients:

Wheat flour - 200gms
Jaggery - 1 cup (grated and loosely filled)
Milk - 1 cup (plus a tablespoon if you feel the batter too thick before transferring to the pan)
Oil - 1/2 cup ( sunflower or rice bran oil)
Soda - 1/2 teaspoon
Baking powder - 1/2 teaspoon
Vanilla - 1/2 tsp

Method:

Sieve flour, soda and  baking powder twice or thrice to combine or whisk in a bowl. Add jaggery and combine gently. Now it's the turn for the milk and the vanilla and lastly the oil. Use a spatula and combine gently.
Bake in a preheated oven for 25-30 minutes with temperature set to 180 deg C or until done while the skewer inserted comes out clean.


-->Namrata had used chocolate syrup and praline for topping the cake which went very well. If you wish to do the same, decrease the amount of jaggery to 3/4 cup.

-->Substitute milk with soy milk for a vegan version.


The result was announced later at night and for our pleasantest surprises we bagged the second and third prizes for the cookies and the choc bombs! :) :)

Read More »

Thursday, October 13, 2011

Jam Tarts


The reason for postponing to make Sweet Punch's jam tarts to the last moment was solely because I felt my son would absolutely love it!  He loved the flavour of Kissan's mixed fruit jam as an infant and later as a teen enjoyed Britannia's Jim Jam or any such jam filled/centred biscuits.
Eventually I was planning to make these cuties last week when he was around for the holidays and unfortunately I was having a much hectic time around with Navarathri, family function and guests at home.
My son will be back home again in another week for the Diwali holidays and I am reserving his favourite munchies which I baked just a couple of hours back!


Jam Tarts

Makes 12
Adapted from Ria
Original source -The Thankam Philip Book of Baking


Ingredients:

Flour-115g
Butter-60g (chilled)
Baking powder-1/2 tsp
Water-4-5 drops
Jam

Method:

Mix flour and baking powder together.
Add the butter and rub it with your fingertips till it resembles breadcrumbs.
Line the tart tins and fill 2/3 of the tart with jam. I divided the dough into 6, since I'd halved the recipe and spread in each tart tin separately by rotating the tin and spreading the dough at the same time by gently pressing with both my thumbs from the centre towards the sides.
Bake at 180 degrees for 15 mins or till done.
De-mould when cooled. Be careful not to burn your fingers with the hot molten jam in the centre.


To be frank, I had my own seconds thoughts whether the tarts could be demoulded perfectly!
For the safer side an extra tsp of butter went into the flour which got transformed to a hard dough from the crumbly one.
The tart tins were buttered quite well and were placed on a flat tray on which I sieved flour, coating evenly every nook and corner, rather than dusting.
Thus my tarts were unmoulded easily and perfectly!

The mistake I did was probably filling the jam a little too much which was bubbling up and overflowing while baking, messing up the oven floor. The sticky dry jam on the sides of the tart tins didn't allow me to unmould, though the tarts were ready to come out :)

I am quite happy about the taste and will be trying out with different fillings!


Read More »

Wednesday, October 5, 2011

Tender Coconut Pudding


 The pictures of this recipe are Food Gawked and TasteSpotted.
 The recipe was also tagged by the Foodbuzz 


This pudding unties a bundle of sweet memories in me! I can hardly remember when and where exactly I tasted tender coconut pudding, first in my life, may be in one of the Christian weddings, but I had hugged the taste ever since it melted on my taste buds when I was a teen. It contains no eggs and this should be the reason why it was so simple and unbelievably comforting! Getting the recipe was not a big task coz this was a regular dessert in many of the Christian homes in Central Kerala. I jotted down the recipe then but I lost it in due course of time...

This is a recreation of the recipe from the basic mousse pudding where I had substituted the coconut and water. It was simple and hassle free... a 'no chance to go wrong' recipe. I had wanted to try this for the past two decades and believe me, it turned out perfect and left me absolutely excited in my very first attempt itself!

Tender Coconut Pudding (eggless)
yields 25 medium squares.(Serves 10.. coz no one can stop with two ;))

 Get ready with :

1 tin sweetened condensed milk = 400gms = 300ml   I used Amul Mithai Mate
*Sugar- 1/4 cup scant (not more than 6 tsps if you prefer less sweet)
China grass / agar agar- 10 gms
Thick (non fat preferable) milk -2 tins; measured in the condensed milk tin.
Tender coconut water- 1 tin
Tender coconut meat - 1/2 cup
(you may need 2 large Tender Coconuts for the water and the meat)


Step by step method


To begin with ,cut china grass into one inch long strips. Rinse and soak in hot tender coconut water for 1- 2 hours.


Let the coconut you scrape out be tender and transparent rather than the opaque whitish matured ones.


Boil milk, condensed milk and sugar together.


Once it boils, simmer just for a few seconds giving a stir in between.


Heat tender coconut water in which the china grass had been soaked and melt it bringing the coconut water to gentle boil. I could melt it within 2 minutes of gentle simmer. Too much of boiling destroys the natural texture and flavour of the coconut water. It is tough to melt down the grass strands completely. A few might remain at the bottom and you may strain and grind it in a mixie before combining with the milk mixture. I didn't do this and combined as it was..


which brought up after the mixing along with the fine tender coconut pieces. These strands are harmless and doesn't alter the texture and the taste of the pudding. When you mix the china grass solution and the milk mixture, let them both be of the same temperature; either warm or luke warm.
 So, after you mix it all together pour in a flat squarish  shallow glass container and not like what I did coz it will be difficult to unmould and slice into serving sizes.


Freeze for 5 minutes and then place it on the normal refrigerator compartment to chill for about 30-45 minutes until it is set. Do not over freeze or chill as it hardens the pudding.


I toppled the bowl gently and it moulded out pretty clean.


Umm.. not bad...


Slice into serving portions. Did I tell you, I halved the original recipe? Mine yielded 16 unequal portions.
You can also use ramekins or small individual bowls for setting the pudding. You need not unmould too.


You may serve the pudding as it is.Transferring into plates is not an easy job as they are soft 'flubbers' :)


The berries are fresh from my garden. My vegetable garden is going crazy these days and I have topped the fruits for a colour contrast and make it  look glamorous.

Another reason of these fruits getting into the dessert is because Raks insisted to have either fruits or veggies in them. ...and all I have is coconut :)...
Well,  Raks as you all know is an awesome blogger with a wonderful variety of recipes, a girl who never fails to encourage most of the bloggers around with her warm and sincere comments. She had been surprisingly regular in mine though I skipped visiting hers many a times. This dessert is specially made for her event, Celebrate Sweets September 2011 event coz she really deserves something sweet and very special! :)..


Note:

 The pudding tastes better, * less sweet. However you can check the sweet level before you freeze and can add more if you want to.
I had added no flavours like vanilla as it just tastes good without a flavouring. The mild natural flavour of tender coconut is irresistible!
You can enjoy the pudding topped with cut fruits, berries or even praline.
I like it as it is :)
Read More »

Tuesday, October 4, 2011

100 Yummy Diwali Sweet Recipes E-Book by Indus Ladies


Indus Ladies the largest  global online community for Indian women is a space where we discuss and share ideas about topics interesting to Indian Women. Discussions about cooking, family and relationships, kitchen and household, beauty and fashion, health, diet and fitness are a few to name. Thus the community undoubtedly paves way to long lasting friendships among the Indian ladies, globally!

They are compiling an E-book for this Diwali that features 100 irresistibly yummy sweet recipes. I deeply appreciate their wonderful idea and effort on compilation of the E-book related to the festival which will be beneficial to many readers, fans and followers!

I am glad to have contributed Godhumai Jira for the book. If you have an apt sweet recipe, do not hesitate to send over your entry before Oct 10th to the Indus Ladies and be a part of the family of the authors of the lovely E-book!

Cheers,
Bharathy 
Read More »
Related Posts Plugin for WordPress, Blogger...