Showing posts with label Wheat flour. Show all posts

Friday, October 25, 2013

Whole Wheat Sandwich Bread


Whole Wheat Sandwich Bread

Whole Wheat Sandwich Bread


If the start of the month got me busy with Navarathri, the rest of the days kept me occupied with travel, weddings,  house visits and condolences to attend. I had to keep myself free for two whole days as the bread needed some planning of time to undergo the 3 interesting phases of preparation.

We, the We Knead to Bake memebers, have been asked to adapt Peter Reinhart’s recipe for 100% Whole Wheat Sandwich Bread from his book “Whole Grain Breads”. Peter Reinhart’s recipe uses a soaking procedure and the Biga/ sponge and that is the secret to the softness and texture of this bread.

If whole grain flours are soaked overnight, especially whole wheat flour, it breaks down the phytates in them, aids mineral absorption and makes them softer and more digestible. Other than that, it is important to knead the dough well to develop whatever little gluten there is in the whole wheat flour. Also be careful while shaping the dough into a loaf and make sure that you do not tear the risen dough as this will tear the gluten “cloak” that would have developed. Do see this video which gives you an idea on how to shape bread loaves. (http://www.thekitchn.com/how-to-shape-a-sandwich-loaf-o-108773 )
This bread is not really difficult to make though it requires a little bit of planning as the Soaker (at room temperature) and the Biga/ Sponge (refrigerated) have to be made and rested for at least 12 hours. After this they can be kept refrigerated for about 2 days before baking them into bread.
Aparna made a few changes to the original recipe and here a few reasons why she did it.

The first change was to use water to make the 'Soaker' instead of milk because she wasn’t comfortable leaving dough mixed with milk on the kitchen counter overnight because it might spoil in my tropical temperatures. However, milk contributes to the softness of bread, so she used milk instead of water in my Biga/ Sponge which would be refrigerated and so be safe.
Then she added a little vinegar to the Soaker and the Biga/ Sponge. Vinegar tends to increase the acidity of the dough which, within limits, helps gluten development and contributes to the “bready” texture. She also added a bit of Vital Wheat Gluten, but not too much (see further down in this post), and some oil. All these helped to make a 100% whole wheat loaf which she felt was better and softer in texture.

About which whole wheat flour to use, we don’t have much choice in this matter in India. If you can find it, use fine milled whole wheat flour, the real “Chakki” ground Atta and not the packaged stuff. Packaged Atta doesn’t give the best results for whole wheat bread but when one has to work with whatever is available, you can use it and bake a fairly decent whole wheat bread with it. I used the Pillsbury Gold whole wheat flour which I use to make chappathis, to make this bread.
You can make this bread without VWG as the soaking and the Biga/ Sponge and the honey and milk are all supposed to make it soft and give it a really good texture. (I comfortably avoided VWG :))


Whole Wheat Sandwich Bread


100% Whole Wheat Sandwich Bread
(Adapted from Peter Reinhart’s Whole Grain Breads)

Ingredients:
For The Soaker:
1 3/4 cups whole wheat flour
1/2 tsp salt
3/4 to 1 cup water at room temperature
1 tbsp vinegar (apple cider or plain)

For The Biga/ Sponge:
1 3/4 cups whole wheat flour
1/4 tsp instant yeast
3/4 cup milk (or a little more)
1 tbsp vinegar (apple cider or plain)

For The Final Dough:
All of the Soaker
All of the Biga/ Sponge
1 1/2 tsp Vital Wheat Gluten (optional)
1/2 to 3/4 tsp salt
1/3 cup whole wheat flour (and a few tbsp. more if required)
2 tsp instant yeast
1/8 cup oil (or melted butter if preferred)
2 tbsp honey

Method:

How to make Biga/Sponge
The recipe suggests to make the Soaker first, I did the other way round. I chose to knead the Biga/sponge, first as it keeps well for 3 days under refrigeration. The Soaker is left outside and once you prepare that, you need you work within 24 hours.

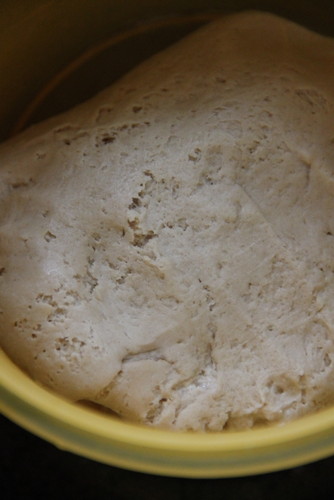
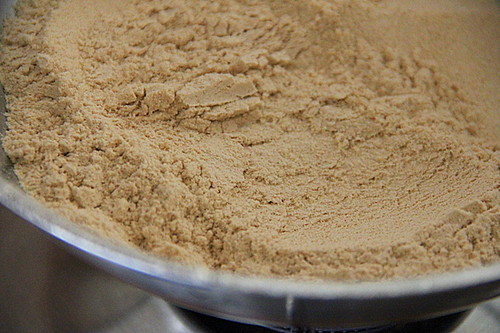
Mix all of the Biga/Sponge in a bowl and knead together well till a soft ball forms.Cover and refrigerate for at least 8 hours or overnight. This will keep for up to 3 days.

Whole Wheat Sandwich Bread


How to make the Soaker.
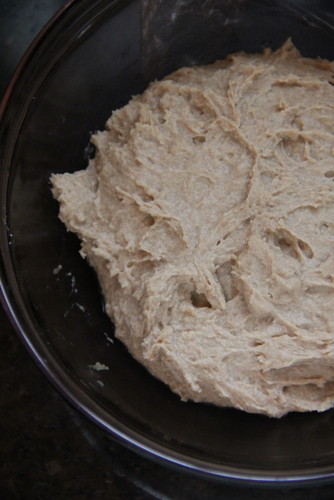
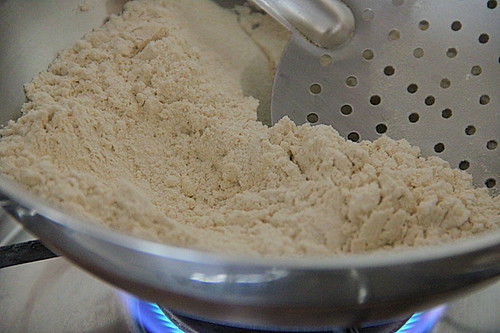
Mix all of the Soaker ingredients together in a bowl until all of the flour is hydrated.
Start using 3/4 cup water and then adding a little at a time, until you have the desired consistency. Cover the bowl loosely with plastic wrap and leave at room temperature for 12-24 hours.

Whole Wheat Sandwich Bread


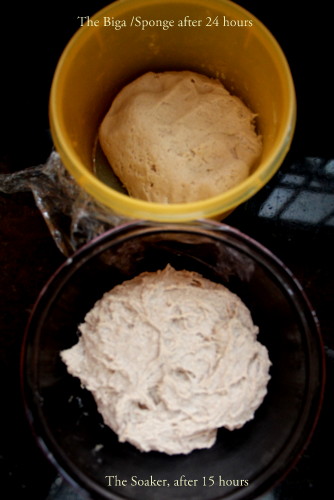
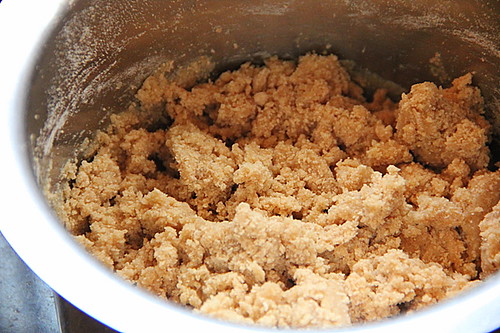
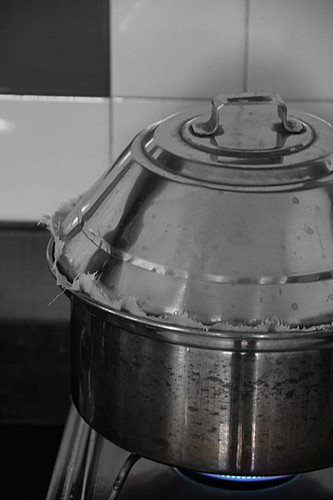
Two hours before you plan to mix your dough for the bread, remove the Biga from the refrigerator and allow it to come to room temperature. You might find your Biga rising a little during this time. Below is the Biga, resting in room temperature after 24 hours of refrigeration.

Whole Wheat Sandwich Bread


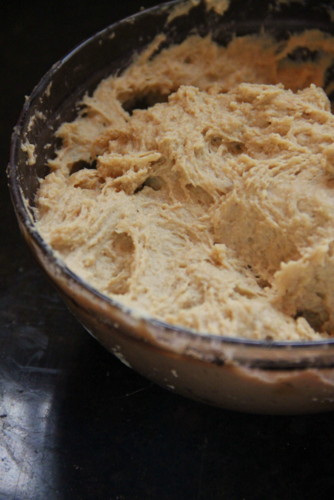
Both the dough, at a glance just before the final mixing up.

Whole Wheat Sandwich Bread


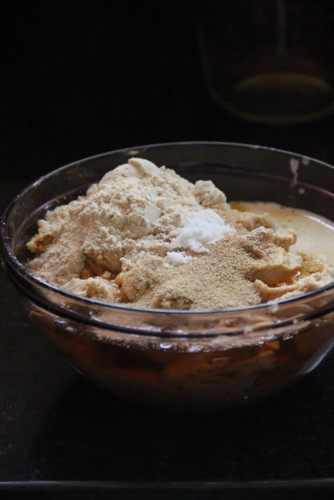
Divide the Biga and Soaker into small pieces (about 12 pieces each) using a sharp knife or scraper and put them in the food processor bowl (or stand mixer). You can knead this by hand too, but the dough will be tacky and a little difficult to manage. Do not be tempted to add more flour, when it is time to, than necessary.
Add the remaining ingredients for the dough, except the 1/3 cup flour and knead for about 3 minutes. I added the flour accidentally, but please don't do it :)

Whole Wheat Sandwich Bread


Let it rest for 5 minutes, then add as much flour as needed (if necessary) to the dough and knead for another 3-4 minutes. Your dough should now come away from the sides of the bowl but still be a little sticky but somewhat manageable. It’s really important to not add too much extra flour during this step.

Whole Wheat Sandwich Bread

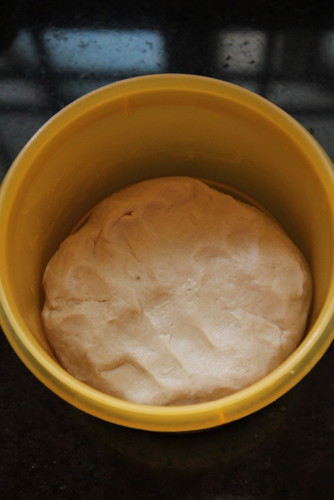
Place the dough in a lightly oiled bowl and let rise until almost doubled (about 1 1/2 hours). I missed to click the picture of the first rise :(
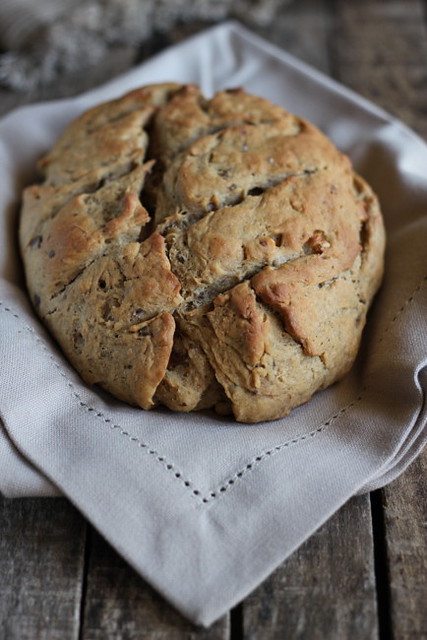
Turn out the dough onto a lightly floured surface and pat the dough out into a rectangle with a width that just a bit less than your loaf tin. See that you do not tear the dough. Roll it up and shape into a loaf.

Whole Wheat Sandwich Bread


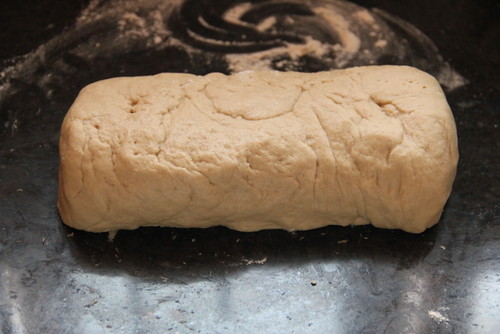
Place your loaf in a greased and floured loaf tin (I used a 9” by 4” silicon bake ware. But I suggest to use a metal loaf tin)

Whole Wheat Sandwich Bread

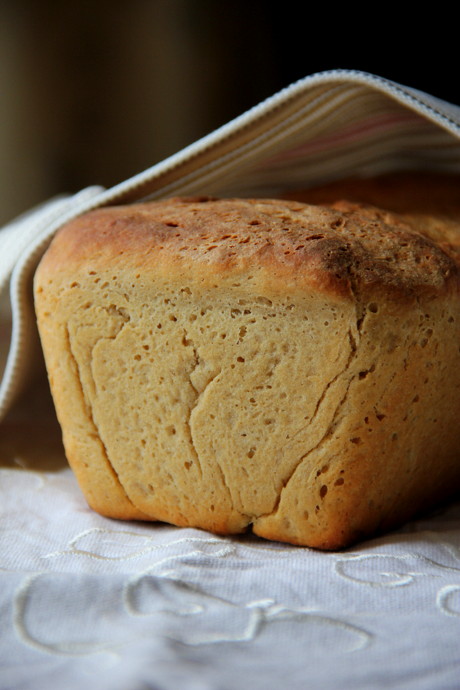
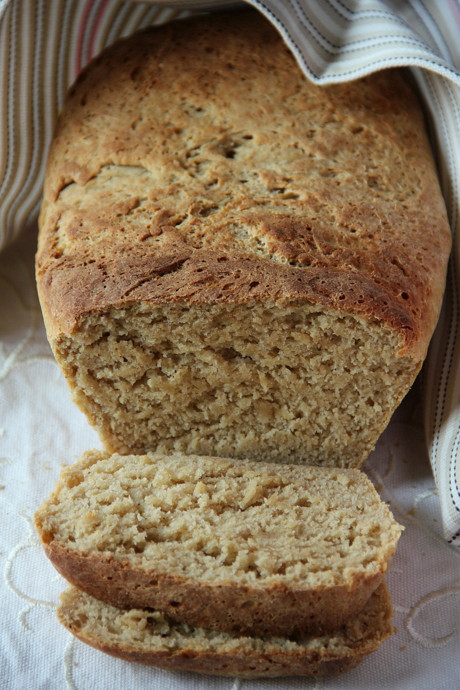
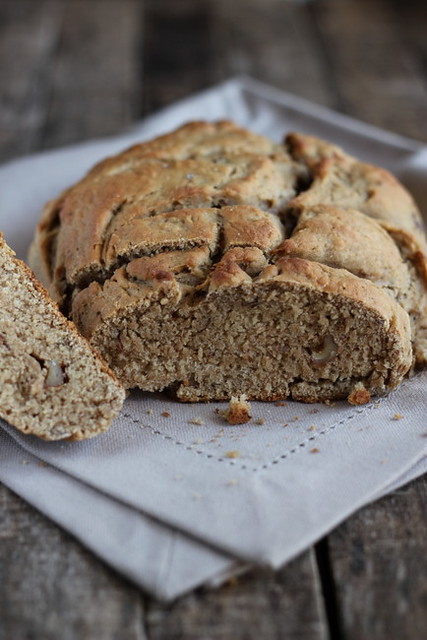
and let it rise until it is just higher than your loaf tin. Bake the loaf at 180C (350F) for about 40 to 45 minutes until the top is a nice deep brown colour and the loaf sounds hollow when tapped.


If you are searching for those proper photos, I missed to capture both the risen dough in the bowl (first rise) and the well risen dough in the loaf pan (second rise) I clicked pictures in my mobile to send to my sis and drowned in the excitement I got confused and thought I clicked with my cam! Anyway, the above is an unedited, crude mobile shot :) as a proof to display the well risen dough. It rose quite fast and well!


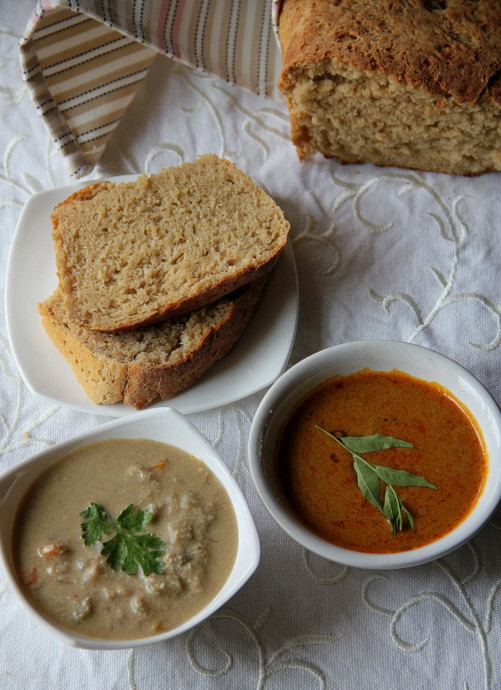
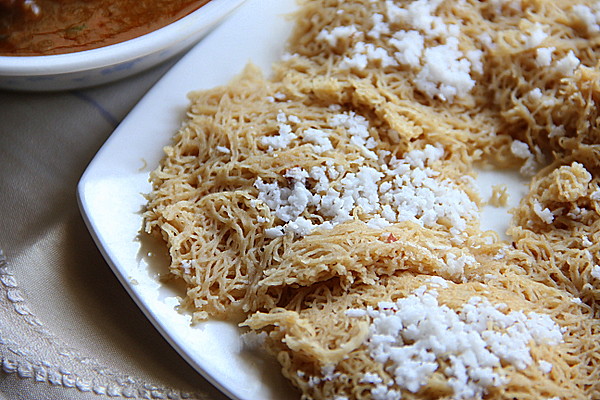
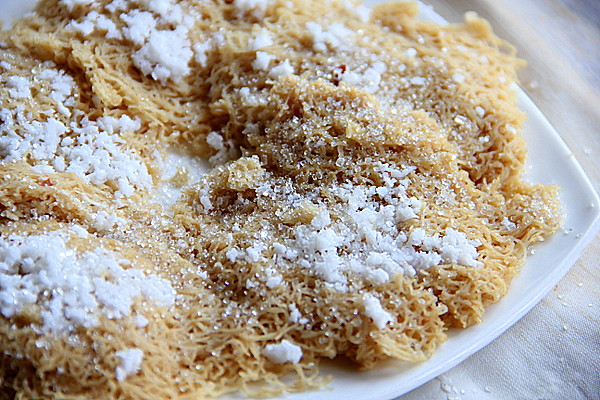
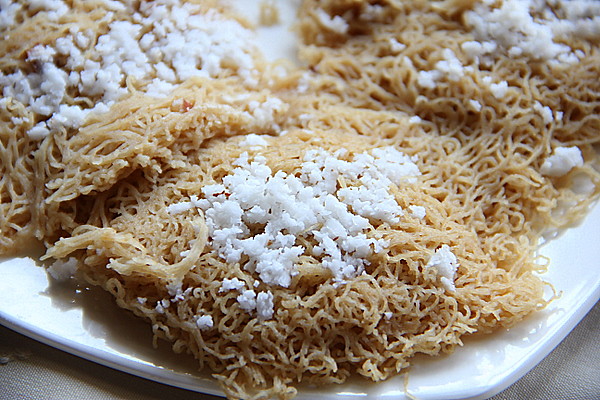
How I served the bread!

Whole Wheat Sandwich Bread

Whole Wheat Sandwich Bread

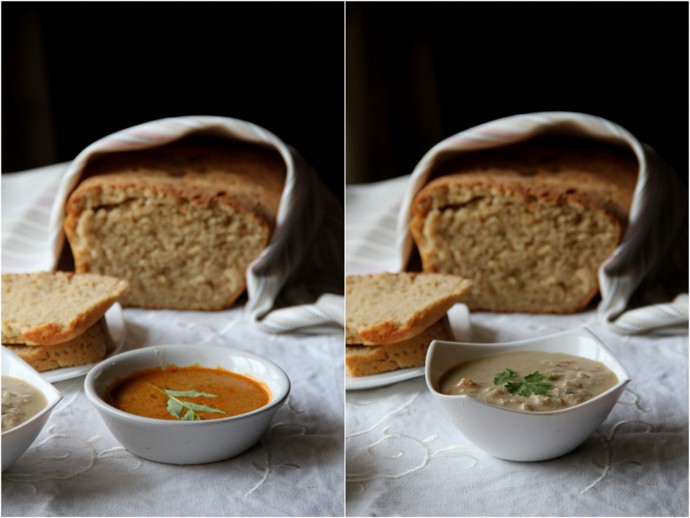
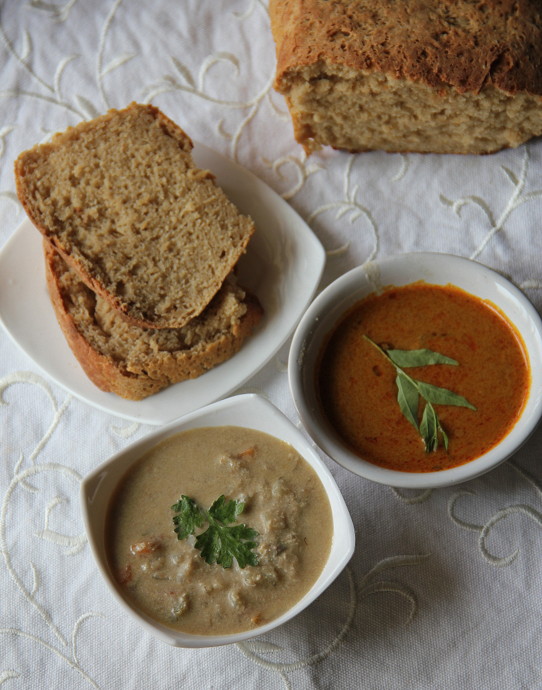
Among all the bakes, I am an expert at and in the learning phases, whole wheat sandwich bread should be the one I should be regularly baking as it falls in our dinner menu. Toasted brown bread with white vegetable khurma and the red spicy khurma with an over load of whole spices and no vegetables. While children love the red dip and V vouches for the white one I enjoy the combination of the two! I left the slices un-toasted this time!


Read More »

Thursday, October 4, 2012

Rustic Wheat, Date & Walnut Bread


I came across this beautiful looking bread in Chinmayie's space. Ever since I had been dreaming baking this, taking pictures and savouring the heavenly stuff!

The attractive part was that, the recipe of this bread seemed to be flexible and I loved the way she'd described..

Read More »

Wednesday, September 19, 2012

Kothu Chapathi with Egg ~ stepwise pictorial


A blogger would know about the mid life bloggers' crisis.
One of my buddy talks about having a bunch of exotic recipes drafted, but reluctant to push out to blog just because she loses words for the introductory part.
Over the years we find ourselves improving in cooking skills, selection of recipes, photographic talents, earning readers...fame... but doesn't really apply when it comes to the 'writing intro part'.. it's monotonous.. stale..boring when it comes to me.

Read More »

Thursday, September 6, 2012

Banana Walnut Bread - without eggs!


                                                Tastespotted and Foodgawked

I admire her.
So does she.
I appreciate her talents and creativity.
So does she.

Read More »

Tuesday, May 1, 2012

Whole wheat Coconut and Cashew cake baked with Coconut Oil


Ihappened to see this interesting combo ultimately made into perfect moist muffins in Dershana's space and I found myself whipping up the cake the very same day!
Dershana, a charming girl, hails from my native town, grew up in the same little community and completed her graduation from the same old college I had been, is my classmate Archana's cousin as well.
This interestingly combined cake batter, she admits, is her invention instilled by the demands of her cute little school going kid! So, obviously this is a kid friendly recipe.
The flavour of  fresh coconut, wheat, coconut oil and cardamom is a delicious melt in your mouth combo complimented by the richness of the cashews!
Read More »

Monday, November 14, 2011

Godhumai Idiyappam / Whole Wheat Flour String Hoppers


Healthy breakfast always goes a longer way. The easily digestible steamed food is not only nourishing but is apt for all ages.

Here is a breakfast which you can prepare within minutes. If you do not have the time to make a side dish for this one, simply drizzle fresh melted ghee and top with sugar. It will definitely be a change to your routine cereal and fruits!

Honestly I havent tasted this ever since. Neither I have seen my mom or in laws steaming wheat flour hoppers!
I was much prompted to try this after a phone call with V's cousin lately  after her beautiful narration of how it's prepared by her ma in law! So, being my first attempt I am still unsure whether I had perfected with the outcome but still couldn't stop me from sharing with you, about just how I made it!


Yields- 10-12 small idiyappams
Serves  2

Whole wheat flour- 1 cup
Salt- 1/4 tsp
Oil - a tsp
Coconut shavings- 1/4 cup or as needed
*Water 1 cup + 2tbsp


Fry the sieved dry flour in a thick/copper bottomed kadai to ensure even heating.(No oil is added)
Keep the flame low-medium and fry continuously. Within two minutes you will see streaks of flour turning dark brown at the bottom and sides even while you stir continuously!


Minimise the heat to low and continue for 8-10 minutes. Take care not to burn the flour!
I fried for 9 minutes, continuously and carried on for another minute in the heat of the pan.


Transfer the flour to a bowl and heat water with salt added. The water should be just hot and should not bubble as you see here.


*For 1 cup of flour, start with 3/4 cup and add the remaining water carefully, little by little. Stir in oil in between.
I needed 1 cup + 2 tbsps of water to make the dough.The amount of water depends upon the quality of the wheat flour as well. Prepare a soft warm dough using a ladle or a wooden stick.


Shape the dough into small cylinders with your fist before to ease into the presser.


Squeeze out the warm dough on your idiyappam plates over the sprinkled fresh coconut gratings.


Place over the steamer, on fire, and it's ready to be steamed.


Steam for about 10 minutes or until done.


Topple carefully inverting the plate with cooked idiyappams over another one.


Wheat Idiyappams go well with coconut based curries like Vegetable Ishtoo / Stew ,  Mutton Stew or Vegetable Khurma. I served with an onion based gravy which was fine too.


I loved it topped with melted ghee and lots of sugar :)


So, never bother if you don't have a side dish in hand..


                    The warm melted ghee and sugar combo is simply flavorful and delicious!

Note

Whole wheat flour with comparatively less gluten content makes the best idiyappams. I used Aashirvaad atta.

Never use boiling water for preparing the dough. Boiled water cooks the flour and makes it difficult to squeeze. The hoppers get  too soft and soggy too!
Fry the flour well. I fried for 9 minutes continuously and continued for another minute in the heat of the pan and am thinking of frying for 9-11 minutes over controlled flame and a minute without flame, the next time I try, making a total of 12 minutes frying time.

Wheat flour Idiyappam needs a little more time than the Rice Idiyappam to get cooked.So, give at least 10 -12 minutes cooking time.

Warmer the dough easier the squeeze. A smart cook can always preserve the heat of the dough, kept as a ball, in a hot box / casserole until the next batch is squeezed. Or one can squeeze out on a couple or more plates and steam the batches at the same time, thus acting fast.

Another method of preparation - Wheat flour is steamed for 20 mins,cooled and sieved, made into a dough and squeezed out. I haven't tried this method though!
Read More »

Monday, October 17, 2011

Eggless Wheat Cake (with Jaggery)


She looked sweet!
When I happened to see her first on the 'food fest' grounds a couple of months back, this girl was busy presenting her goodies on the plate. I watched her with a smile from some distance which she couldn't have possibly realised! Herself and me were among the 50 competitors who contested for the cooking contest arranged by the 'food fest' team.The ingredient for the day was 'wheat flour' (with which we were supposed to make something sweet!) Among the crowd of competitors she invariably stood out which would have probably caught my eyes!

I saw her working in a hurried way as she had to work with the toppings making it look perfect before we were asked to place the trays on the table for judgement. Since I was through with my wheat flour almond cookies, I walked up and offered help to this sweet girl who was already with her finishing touches.
I told her I would mind her handbags and things while she presents her plate on the table and she smiled and thanked me while hurrying off.

While we were waiting for the judge to arrive, we had a chat. She introduced herself as Namrata and talked about her native place. We talked as if we knew for ages.
After the judgement got over we exchanged what we made. She happily shared her wheat flour cake and chocolate bombs while I shared my cookies.

The cake as well as the chocolate bombs were simply irresistible!
I absolutely loved the cake which was moist and light with a different taste and much "Indianish".She said it was eggless and had jaggery instead of sugar!
I had always thought of a cake sweetened with jaggery and here I am with a perfect recipe!
I got excited and couldn't wait to grab the recipe from her!


Eggless Wheat Cake

Ingredients:

Wheat flour - 200gms
Jaggery - 1 cup (grated and loosely filled)
Milk - 1 cup (plus a tablespoon if you feel the batter too thick before transferring to the pan)
Oil - 1/2 cup ( sunflower or rice bran oil)
Soda - 1/2 teaspoon
Baking powder - 1/2 teaspoon
Vanilla - 1/2 tsp

Method:

Sieve flour, soda and  baking powder twice or thrice to combine or whisk in a bowl. Add jaggery and combine gently. Now it's the turn for the milk and the vanilla and lastly the oil. Use a spatula and combine gently.
Bake in a preheated oven for 25-30 minutes with temperature set to 180 deg C or until done while the skewer inserted comes out clean.


-->Namrata had used chocolate syrup and praline for topping the cake which went very well. If you wish to do the same, decrease the amount of jaggery to 3/4 cup.

-->Substitute milk with soy milk for a vegan version.


The result was announced later at night and for our pleasantest surprises we bagged the second and third prizes for the cookies and the choc bombs! :) :)

Read More »

Monday, August 22, 2011

Godhumai Jira / Instant Wheat Flour Halwa


I

mastered 'Godhumai Jira' from 'Ammayi, my husband's maternal Grandma. Years back, as a newly wed she amazed me each time she made this sweet in a jiffy for the unexpected guests who would simply admire the heavenly taste!

By typing 'mastered' I mean it!  Many of my husband's relatives learnt the recipe from 'Ammayi' but were not able to come out like hers when they tried. I admit I'd failed at least half a dozen times ;) ;thanks to the inspiring spider and the king story which never let me surrender and propelled me for years until I made it perfect!

'Ammayi', on the other hand, claims to have learnt the recipe verbally from one of her family friends. Trying to source out the cuisine I had pestered her with all sorts of queries pertaining region, whether she was a Gujarathi, Marathi, Rajasthani etc. She continues to say "Vadakkathi" meaning North Indian!

So invariably this belongs to North India. Friends, any idea to which state this belongs, please? :)

My in-laws had named this 'Godhumai Jira 'which again confuses me, especially with the latter part. Why 'Jira'?
The speciality of this sweet is that it calls for just 4 ingredients, wheat flour, ghee, sugar and water with no added colours, flavours, dried fruits or nuts! Still it tastes Heaven!

I had made up my mind, ever posted, I should make it a real elaborate step by step post to make it as easiest as possible for my readers, It seems to be elaborate, take my words, the time span between the image no:1, just below  and image no:19 with the final product is not more than 5 minutes!!


Ingredients for Wheat flour Halwa

Whole wheat flour/ Atta - 1/2 cup
Ghee- 1/2 cup (same amount as wheat flour...never compromise the quantity)
Sugar - 3/4 cup (slightly lesser than two parts of flour)
Water - 1 cup + about 1/4 cup ( 2 1/4 parts of flour)

Clear?? :)

So here we go.....you can never flaw with these anyway :)


Heat ghee / clarified butter in one of your non stick pans.
I used fresh homemade cow's ghee, amma had sent over :)    ( Thanx girls, for tolerating a bit of bragging :))


I used a shallow nonstick pan and lesser ratio of ingredients for the pictorial and please go ahead with your wider deeper pans. For beginners I strongly suggest to start with minimum quantity, say, 1/4 cup of wheat flour and 1/4 cup of ghee like I am doing here!


Add wheat flour to the heated ghee


Ah! while you place the pan to heat ghee, place the pan of water (flour : water =  1 : 2 1/4) simultaneously on the adjacent stove over medium flame.


Blend ghee + atta well. It should be watery and not thicker than you see here. This is important!


Keeping flame to minimum, stir the mixture continuously.


You can see the colour changing while the flour gets cooked in ghee


This will take 2-3 minutes (if you have used 1/4 cup of flour and ghee) and you see the flour attaining a deeper brown hue with the distinct aroma of wheat + ghee all around you!


The water must have reached the rolling boiling stage now. Make sure you don't let it boil and evaporate as we might mess up with the ratio

Ah! seems now I am burning the mix!!


Yes, this is where you are supposed to reach with the wheat and ghee part. I removed it from fire and brought it under daylight to show you the actual colour.


You don't have to put off the stove as I did and can dump sugar..


..followed by the boiling water. Be careful as you see the mix rising up a bit with a hissing sound and settling down the next second, since you are using the boiling water. Be careful with the very hot water too.

 This was the moment I was desperately in need of a third hand and envied our Hindu Gods.... was literally struggling with hot water, spatula and the camera set to auto shoot..


This stage reaches after 2 seconds from the previous. I had to put off the stove after my struggle to click a decent picture :)


The same stage for a closer shot. While you mix, ensure there are no lumps formed. It is safer to put off  fire for a few seconds until you blend the mixture well.


Keep the flame low and stir.


Aw! Seems I had both the hood lamps on and the color is confusing!


Yes! Put off one and note the consistency and the colour. This stage is reached within a minute after you mix the flour, ghee and boiling water.


Within seconds you can see the whole thing forming into a smooth glossy mass, leaving sides of the pan with a wonderful aroma. Interesting, na? :)


Ah! there you go! heave a deep sigh of relief, you've made it!
Put off fire. Transfer to another bowl and leave it cool a bit. The halwa will be really hot!


Enjoy the warm bowl of sweet. There are no added colours . No added flavours either!


Ammayi, the greatest cook of our family, is almost bedridden with limited mobility. She can no more amaze her guests with godumai jira but still loves to have it in spite of her ever shooting blood-sugar levels :)


Updated :

Hi Bharathy, this is what we Maharashtrians call Kankecha Shira meaning Wheat flour shira, probably "jira" is a mispronounced "shira". It is a rural specialty rustled up for surprise visitors. Me having grown up in Mumbai had never tasted this but a friend from Nagpur made it for me and said it is very common in the countryside. The golden roasting in ghee is the key to a good shira.

Thank you Anjali for your valuable info!


According to Kool Kitchen, Wheat Flour Sheera ( कणकेचा शीरा) is a traditional Maharashtrian sweet, usually served as ‘Prasad’ for Satyanarayanpuja.


Read More »
Related Posts Plugin for WordPress, Blogger...