According to Aparna, for the recipe choice towards We Knead to Bake #3,
the Hokkaido Milk Bread is very easy to make.This bread with all the goodness of milk is unique not just for texture and height, but also of its slightly unusual method of making the dough.
Also known for its soft cottony/pillowy texture, it’s a very popular bread in South Asian bakeries across the world. It is also named as Asian Sweet Bread and Hong Kong Pai Bo. Some people say this is a Japanese bread while others say it’s because the milk used in this bread is from Japan while some others have suggested its pure white colour and the texture resemble the pristineness of Hokkaido!
The Hokkaido Mild Bread owes its texture and height to the use of an interesting ingredient called Tangzhong. Basically, the Tangzhong method involves cooking 1 part of bread flour with 5 parts of water (by weight) at 65°C (149 °F) to form a roux.
At 65°C, the gluten in the bread flour and water mixture would absorb the moisture and create a “leavening” action. When the Tangzhong is added into other ingredients of a bread dough, it produces light, tender and fluffier bread.
This method of using Tangzhong is often seen in South Asian breads and was created by a Chinese woman, Yvonne Chen, who describes this method in her book which translates to “65 degrees Bread Doctor” .
Hokkaido Milk Bread With Tangzhong
(Original Recipe from 65 Degrees Tangzhong “65C Bread Doctor” by Yvonne Chen, and adapted from Kirbie’s Cravings)
Makes one loaf (9” by 5” tin), 2 small loaves (6” by 4” tins) or 1 small loaf (6” by 4”) and 6 small rolls (muffin tins).
Time needed to prepare Tangzhong - 5 minutes
Time needed for preparation and kneading - 30 minutes
Rising time- 45 mins + 1 hour
Baking time- 25 minutes
Total time needed - less than 3hrs
Ingredients:
For The Tangzhong (Flour-Water Roux)
1/3 cup all-purpose flour
1/2 cup water
1/2 cup milk
For The Dough:
2 1/2 cups all-purpose flour
3 tbsp sugar
1tsp salt
2tbsp powdered milk
2 tsp instant dried yeast
1/2 cup milk (and a little more if needed)
1/8 cup cream (25% fat)
1/3 cup tangzhong (use HALF of the tangzhong from above)
1/4 tsp salt
25gm unsalted butter (cut into small pieces, softened at room temperature)
1/2 to 3/4 cup mini chocolate chips if making the rolls
Method:
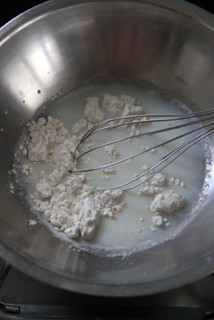
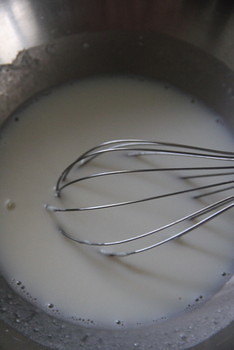
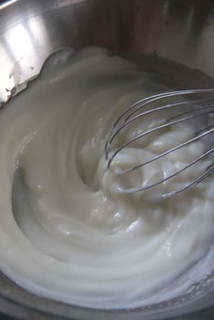
The Tangzhong (Flour-Water Roux):
Whisk together lightly the flour and water in a saucepan until smooth and there are no lumps. Place the saucepan on the stove, and over medium heat, let the roux cook till it starts thickening. Keep stirring/whisking constantly so no lumps form and the roux is smooth.
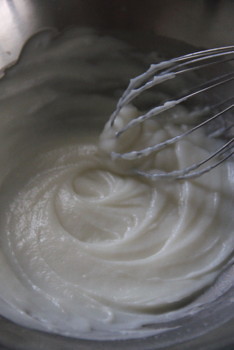
If you have a thermometer, cook the roux/tangzhong till it reaches 65C (150F) and take it off the heat. If like me, you don’t have a thermometer, then watch the roux/ tangzhong until you start seeing “lines” forming in the roux/tangzhong as you whisk/ stir it. Take the pan off the heat at this point.
Other indications beside the visible lines are:-
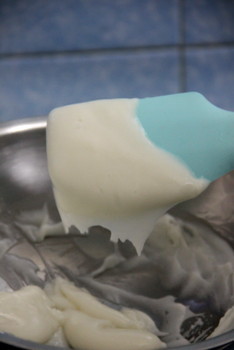
1. Feel the heat of the mix with your index finger; will be the maximum bearable heat. (Bearing in mind, the warm 36 deg C- our body heat and steaming hot 100 deg C of boiling water, 65C is somewhere in the middle).
2. Tangzhong falls slowly as a thin sheet from a rubber/silcon headed spatula after done. It will have the consistency of a soft and creamy crème patisserie.
Let the roux/tangzhong cool completely and rest for about 2 to 3 hours at least. If not using immediately, transfer the roux to a bowl and cover using plastic wrap. It can be stored in the fridge for about a day. Discard the tangzhong after that.
I made the mix, the previous night and chilled overnight in a tupperware container. The next morning I brought it back to room temperature along with the other frozen ingredients, butter and cream. This way, I could start making the bread right away in the morning.
The Bread Dough:
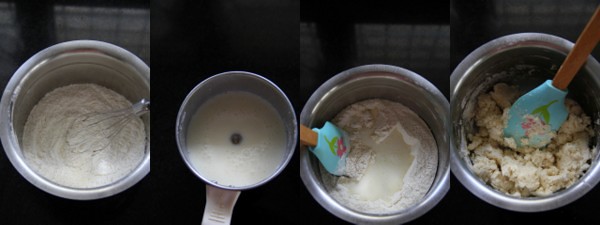
--> Put the flour, salt, sugar, powdered milk and instant yeast in the processor bowl and pulse a couple of times to mix. ( I used a hand whisk to combine )
--> In another small bowl mix the milk, cream and Tangzhong till smooth and add to the processor bowl. ( I used the mixer to blend the 3 )
--> Run on slow speed until the dough comes together. ( Made a well in the centre of the dry mix, poured the wet ingredients and used a spatula to mix as the dough was very sticky at this point )
--> Make the dough in a food processor. This dough can be made by hand but the dough is a bit sticky and can take some time and effort to knead by hand. If you have some sort of machine which will do the kneading for you, use it. And do not add more flour to make it less sticky either!
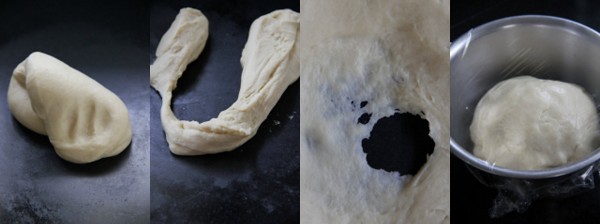
--> I hand-knead the dough as I do not have a food processor. (The dough will start out sticky but kneading will make it smooth esp after the addition of butter in the coming step)
Add butter and process till you have a smooth and elastic dough which is just short of sticky.
--> If the dough feels firm and not soft to touch, add a couple of tsps of milk till it becomes soft and elastic.
--> When the dough is done, you should be able to stretch the dough without it breaking right away.When it does break, the break should be form a circle.
--> Form the dough into a ball and place it in a well-oiled bowl turning it so it is well coated. Cover with a towel or cling wrap and let the dough rise for about 45 minutes or till almost double in volume.
Division into loaves(small/large) and rolls
Place the dough on your working surface. You don’t need flour to work or shape this dough. This recipe makes enough dough to make one loaf (9” by 5” tin), 2 small loaves (6” by 4” tins) or 1 small loaf (6” by 4”) and 6 small rolls (muffin tins). Depending on what you are making, divide your dough.
If you are making 1 loaf, divide your dough in 3 equal pieces. If you are making two smaller loaves, divide your dough into 6 equal pieces.
For one small loaf and 6 small rolls, first divide the dough into two equal pieces first. Then I divided the first half into three equal pieces to make the loaf. The other half was divided into six equal pieces for six rolls.
The shaping of the portions, whether for the loaf or the rolls, is the same.
I made a small loaf with original recipe halved, as below..
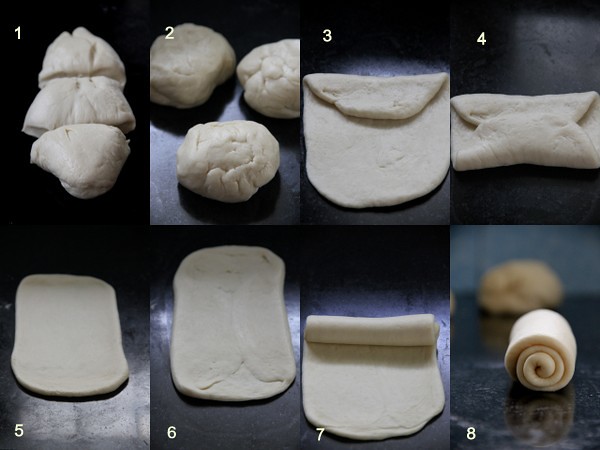
1. Punch the risen dough and divide into 3 portions
2. Form into smooth balls; smoother than the balls in the picture, pls :)
3. Roll out each portion of the dough with a rolling pin into an oval shape, about 1/8” thick. Take one end of the dough from the shorter side of the oval and fold it to the middle of the oval.
4. Take the other end, from below, and fold so it slightly overlaps the other fold.
5. Turn over. Roll this folded dough, lengthwise, with the rolling pin so the unfolded edges are stretched out to form a rectangle.
6. Turn over again so that the folded edges are visible.
7. Roll the rectangle from one short edge to the other, pinching the edges to seal well.
8. Place the edges facing down.
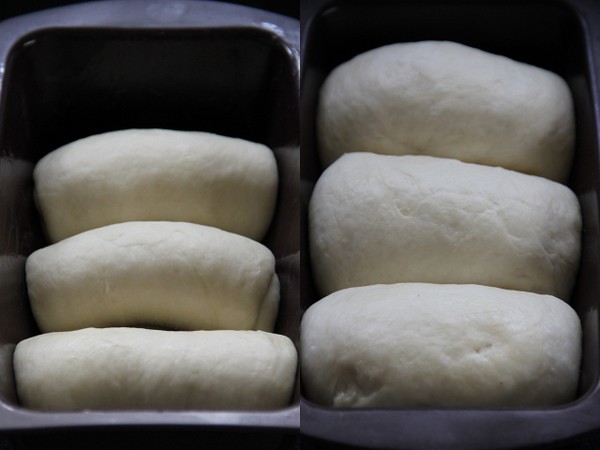
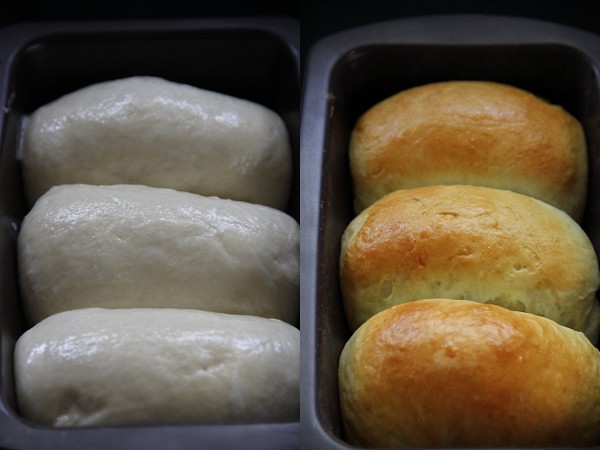
Before Rising After Rising (45 minutes-1 hour)
Do this with each of the three larger pieces and place them, sealed edges down, in a well-oiled loaf tin. Cover with a towel or cling wrap and leave the dough to rise for about 45 minutes.
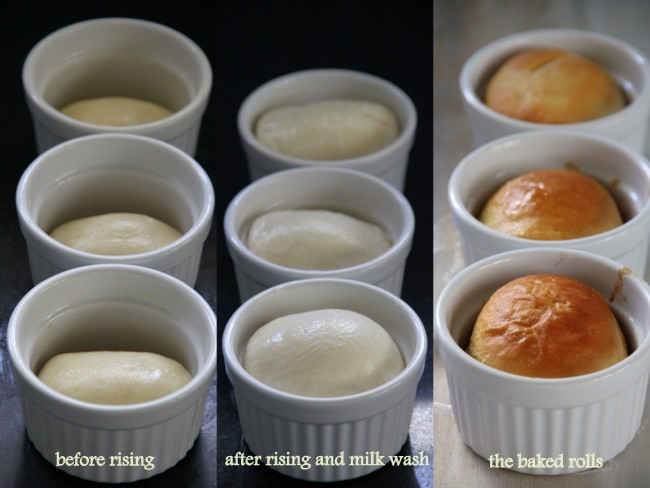
Milk wash done on the risen rolls Baked!
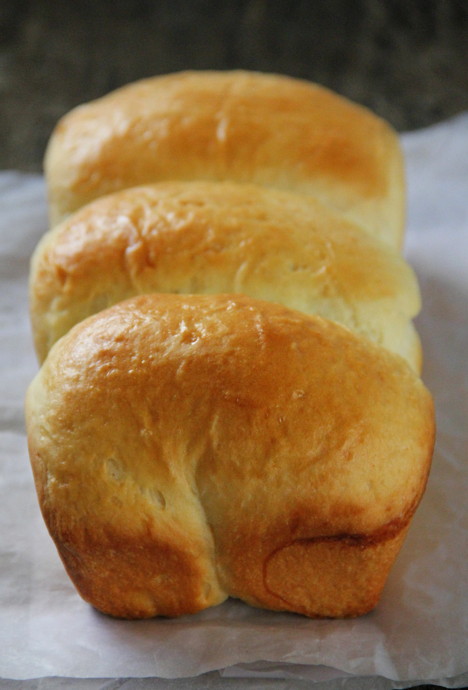
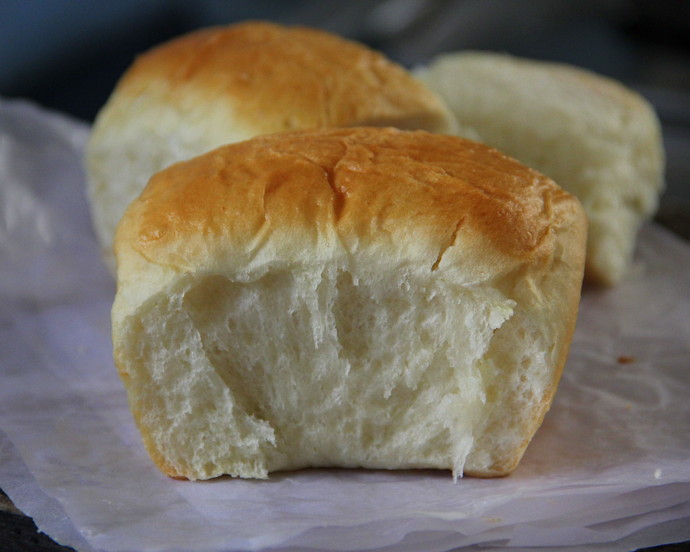
Carefully brush the tops of the rolls and the loaf with milk or cream (I used a mix of a tsp each of milk and cream) and bake them at 170C (325F) for about 20 to 30 minutes till they are done.If you tap them they’ll sound hollow and beautifully browned on top. Let them cool in the tins for about 5 minutes and then unmould and transfer to a rack till slightly warm or cool.
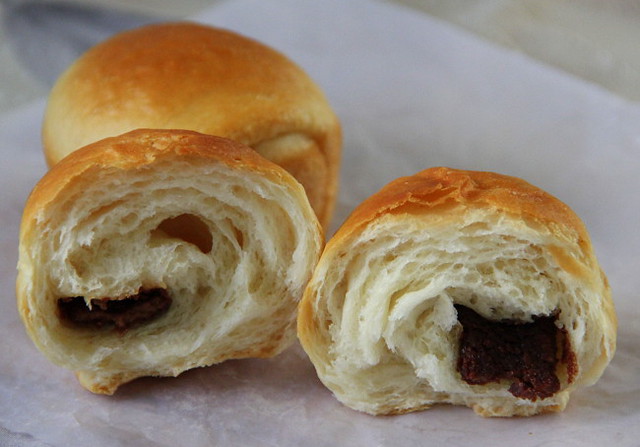
Chocolate Rolls
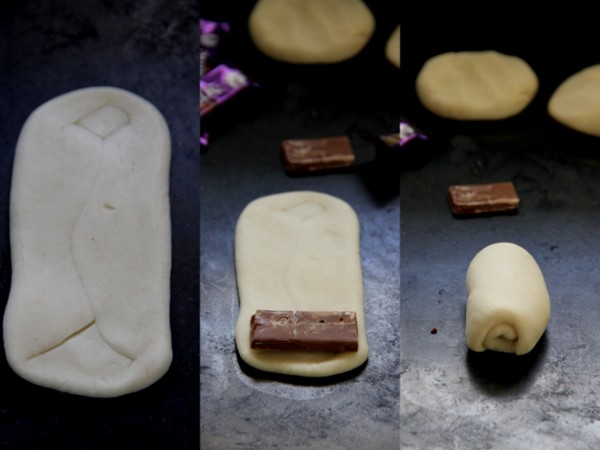
To make the chocolate rolls fold them in the same manner described above, but before rolling them up, place some chocolate chip on the dough. Roll the dough rectangles carefully and pinch to seal the edge. Place each roll of dough in a well-oiled muffin cup and cover with a towel. I used ramekins and dairy milk sticks to stuff in. Allow to rise for about 45 minutes ( I left them for an hour )
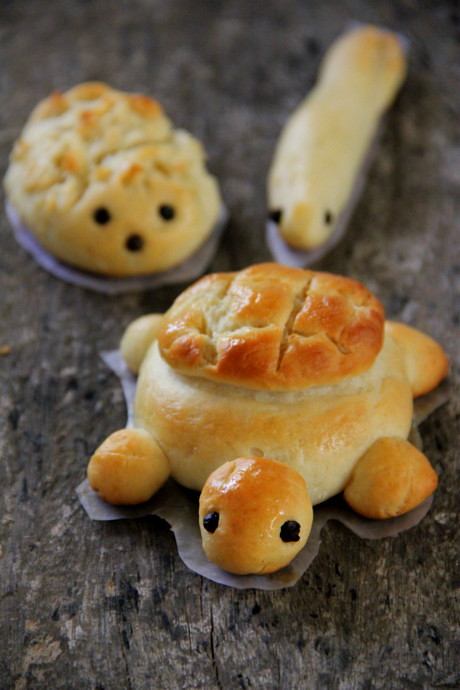
Play with the dough. Make Cute Animals with/for your Kids! :)
Tastespotted and Foodgawked
You need to be really fast while shaping animals, as the dough starts rising in a crazy way(while shaping and baking). Muster your patience if aiming for perfection :)
My baby tortoises turned into giant turtles, worms into pythons and hedge hogs into trunkless elephants which were kneaded again and frozen but still grew into porcupines :P
No first and second rising were given for these animals as I took a total time of around 15-20 minutes for shaping.
The animals were soft to eat!
As you can see, this is a very versatile dough. You can make into a plain loaf, or dinner rolls. You can fill the rolls with sweet or savoury fillings. You can even shape the dough into knots, or cute little animals. This dough also makes the softest Pav/ Pao for Pav Bhaji.
Though it has some sugar in it, this bread is only mildly sweet. If you want to make a savoury version, with or without filling, you can cut down the sugar to 1 tbsp and add another 1/4 tsp of salt.
The recipe below asks for a small amount of cream as an ingredient. If you would rather not use it, just omit it and add 2 tbsp of milk instead. If you would like to make this vegan or milk and milk product free, then replace the milk with water and the butter with oil. Of course, then this loaf will no longer have the typically “milky” taste of a milk bread but will still be a pretty good bread.
The bread is easy to make though the recipe seems to be elaborate. I ended up baking it 4 times within a week and enjoyed each time while doing it!



Very nicely done, appreciate your patience in making and explaining.
ReplyDeleteoh wow... such a beautiful post... the bread looks lovely and those chocolate rolls, yum!!!!
ReplyDeletei simply loved the picture showing the dough and the other baked....what a beautiful golden brown baked bread - lovely writing. like jeyashri said - appreciate your patience in explaining this recipe so clear.
ReplyDeleteThe texture of this milk bread is unbelievable, while the browning on top is of professional quality. Your chocolate rolls are the best! Can I have one of those? The cute animal shapes are very pretty too. Believe me, you are a great baker, Bharathy!
ReplyDeleteSo so pretty! Loved all the pictures! Those little fellas are adorable and cutely posing :) Do I actually see a smile on the turtle's face? :D
ReplyDeletelove the idea of making individual servings by putting them in ramekins!! thanks for the idea!!! looks so soft and so delicious!!!
ReplyDeleteSowmya
Ongoing Event - HITS - Diabetic Friendly
Ongoing Event - Healthy Foods for Healthy kids - Italian Dishes (w Giveaway)
So soft and delicious looking bread. Simply drool worthy.
ReplyDeleteDeepa
Totally love the water roux method and I use it now for all my bread and buns. You can see that I have used it with good results for my white loaf, Japanese milk bread (which is exactly what you have here) and also to make hot-cross buns! See below for links:
ReplyDeletehttp://kuttybear-toddlerfoodideas.blogspot.co.uk/2013/03/soft-basic-white-bread-with-water-roux.html
http://kuttybear-toddlerfoodideas.blogspot.co.uk/2013/02/japanese-milk-bread-with-water-roux.html
http://kuttybear-toddlerfoodideas.blogspot.co.uk/2013/03/hot-cross-buns-just-in-time-for-easter.html
beautiful n gorgeous bake...yummy
ReplyDeleteWow.. awesome clicks.. Fluffy, soft white bread...And love those cute lil animals..
ReplyDeletei m in love with those cute animals Bharathy and oh! what can i say about the bread except that it s bread heaven
ReplyDeleteBeautifully baked bread, mindblowing and well done.Super cute animals.
ReplyDeleteWonderful presentation....very well and neatly explains each and every step...
ReplyDeleteMoreover it has come out in fantastic way...
I have to bake this bread Bharathy. I am so hooked to it seeing it all over facebook. And love those cutie pies, nah bread. I will keep those cute animals in mind when I bake it for my little one.
ReplyDeleteThanks for your lovely and encouraging comments. I am totally addicted to the water roux method. I now try it with every thing I make :) Tonight, I tried honey partybrot with it and it turned out fantastic :) Check out http://kuttybear-toddlerfoodideas.blogspot.co.uk/2013/03/honey-partybrotpartybread-water-roux.html
ReplyDeleteLooks soft loaf..nice
ReplyDeleteYour bread so fits the bill of cotony/pillowy description!! Loved the little overgrown animals...very cute
ReplyDeleteGosh they looks so perfect and that little turtle one is just adorable!
ReplyDeleteSimply superb!
ReplyDeleteThe hokkaido milk bread looks great! I've never had it. I think I'm going to try making it soon!
ReplyDeleteAlso,Thanks for participating in this month's DMBLGiT contest!
Looks super soft...tempts me to try it..looks yumo
ReplyDeleteHello! This is something new for me and its a perfect recipe for my children who always go to school everyday and I wanna try to bake this at home for them. Thank you so much for sharing this! xoxo
ReplyDeletecakes bakery in Brooklyn